RKE2 on AWS with Rancher
Jun 25, 2025
|
15
min read
TL;DR
In five weeks I went from AWS certification theory to hands-on Kubernetes experience, building a production-ready RKE2 cluster from scratch. I deployed a 2-node cluster (server + agent) on AWS EC2, installed Rancher via Helm for cluster management, and containerized a Python quotes application with Docker. The full pipeline flows from VSCode development through GitHub, Docker Hub, to Kubernetes deployment with 1 running replica. Everything runs on AWS with a pre-configured security group, an Elastic IP, and DNS routing. Key technologies exposure: EC2, RKE2, Kubernetes, Docker, Rancher, Helm, kubectl, systemd, and container orchestration. Biggest lessons: configuration details matter (wrong IP addresses break everything), Docker images are immutable snapshots, Git hygiene prevents 133MB disasters, and systematic debugging beats panic. The result is a fully functional cloud-native deployment pipeline I can scale, monitor through Rancher, and confidently add to my résumé as real production experience.
From Zero to Kubernetes: The Summer Project
Deploying a Python App on AWS with RKE2 and Rancher
Introduction
As part of a research internship, I started this summer project knowing almost nothing about Kubernetes or Rancher. While I had recently completed my AWS Cloud Practitioner and AI Practitioner certifications, giving me some foundational cloud knowledge, I was still a student with only basic coding skills. I was both excited and nervous about the challenge. My goal was to deploy a simple Python "quotes" API on a Kubernetes cluster in AWS, using Rancher (RKE2) to help manage it. Over five weeks of the Early Start program, I went from logging into AWS for hands-on work for the first time to seeing my app running in a pod. The journey involved applying my AWS fundamentals, learning containerization, and diving deep into Kubernetes tools: a lot to unpack, but highly rewarding.
Week 1: Applying AWS Knowledge - Setting Up EC2
In week 1, I focused on applying my AWS foundational knowledge to hands-on work. While I had studied AWS concepts for my Cloud Practitioner certification, this was my first time actually building infrastructure. I logged into the AWS console, created a key pair (a public/private SSH credential for EC2), and launched an EC2 instance (Ubuntu, t2.xlarge) in us-east-1. Fortunately, my instructor had already created and configured the security group (basically a virtual firewall for the instance) with all the necessary ports open: SSH (port 22), HTTPS (443), Kubernetes API (6443), and RKE2 node join (9345). This saved me from having to figure out the networking requirements myself. With the EC2 running, I used my private key to SSH in (for example: ssh -i mykey.pem ubuntu@<EC2-public-IP>). Having my own dedicated server for this project felt like a solid foundation to build upon!
Key accomplishments:
I created an EC2 key pair (you store the private key locally) so I could SSH securely.
I used the pre-configured security group that my instructor had set up with all necessary ports (22, 443, 6443, 9345) for the full Rancher/Kubernetes setup.
I SSH'ed into the instance and made sure everything was running (just basic Linux commands at first).
By the end of week 1 I had a single EC2 VM up, with SSH access working and a minimal setup. I was ready to install Kubernetes (RKE2) on it.
Week 2: Installing RKE2 (Server/Control Plane)
In week 2, I turned that EC2 into an RKE2 (Rancher Kubernetes Engine 2) control plane node. Following the RKE2 quick-start guide, I ran the install script on the VM. In practice, this meant first updating the system and preparing it for RKE2:
Then installing and starting RKE2 on the server node:
This installed the RKE2 server and set up the rke2-server service. After enabling and starting the service, the machine became the Kubernetes server (aka control plane). RKE2 automatically wrote a kubeconfig file (rke2.yaml) and generated a join token (node-token). Essentially, the cluster with one node (itself) was now live. I tested connectivity using kubectl get nodes (after exporting KUBECONFIG=/etc/rancher/rke2/rke2.yaml), the one node showed up as Ready.
Meanwhile, I learned about RKE2's ports: by default, the server listens on port 9345 for agent nodes to register, and on 6443 for the Kubernetes API. Thankfully, the security group was already configured with these ports open (along with SSH 22), so I didn't need to worry about networking configuration. This was also when I reserved an Elastic IP for the server instance, so its public IP wouldn't change. Having a stable IP would make it easier to ssh into the server and also when my instructor later set up a DNS record (so we could use a custom domain like rancher.example.com to reach Rancher).
Week 3: Joining the RKE2 Agent Node
Week 3 was about scaling up the cluster. First, I needed to set up kubectl properly on the server node to manage the cluster, then I spun up a second EC2 (same type, Ubuntu) to act as a worker (agent) node.
Setting up kubectl on the Server Node
Before adding the agent, I configured kubectl on the server to properly manage the cluster:
Installing the Agent Node
On the new agent VM, after switching to root and updating the server, I installed RKE2 agent and configured it to join the existing cluster:
Then I created the file /etc/rancher/rke2/config.yaml on the agent and added:
After saving the configuration, I started the agent service:
Debugging Agent Connection Issues
However, I ran into my first real debugging challenge here. When I tried to start the rke2-agent service with systemctl start rke2-agent.service, it just sat there hanging with no output or error messages. The service wasn't starting properly, but it wasn't giving me any clues about why.
After running
and doing some investigation on the logs, I discovered the problem was in my config.yaml file. I had mistakenly used the private IP address of the agent instance itself instead of the server instance's private IP. This meant the agent was trying to connect to itself rather than to the actual RKE2 server.
Once I corrected the config.yaml file to use the server's private IP address, I needed to reload the systemd configuration and restart the service:
This time it worked perfectly! The agent successfully connected to the server.
This pointed the agent to the server: it knew which server to connect to on port 9345. After resolving the initial configuration issue, the rke2-agent service started successfully, and soon the agent reached out and registered itself with the control plane.
Now the cluster had two nodes (one control-plane, one worker). Using kubectl get nodes (with the same KUBECONFIG as before) I saw both nodes listed: the server and the agent were both Ready. At this point, the core Kubernetes cluster was up on AWS. The pre-configured security group already allowed all needed traffic (SSH 22, Rancher 443, Kubernetes 6443, RKE2 9345) so the nodes could communicate properly without any additional networking setup on my part.
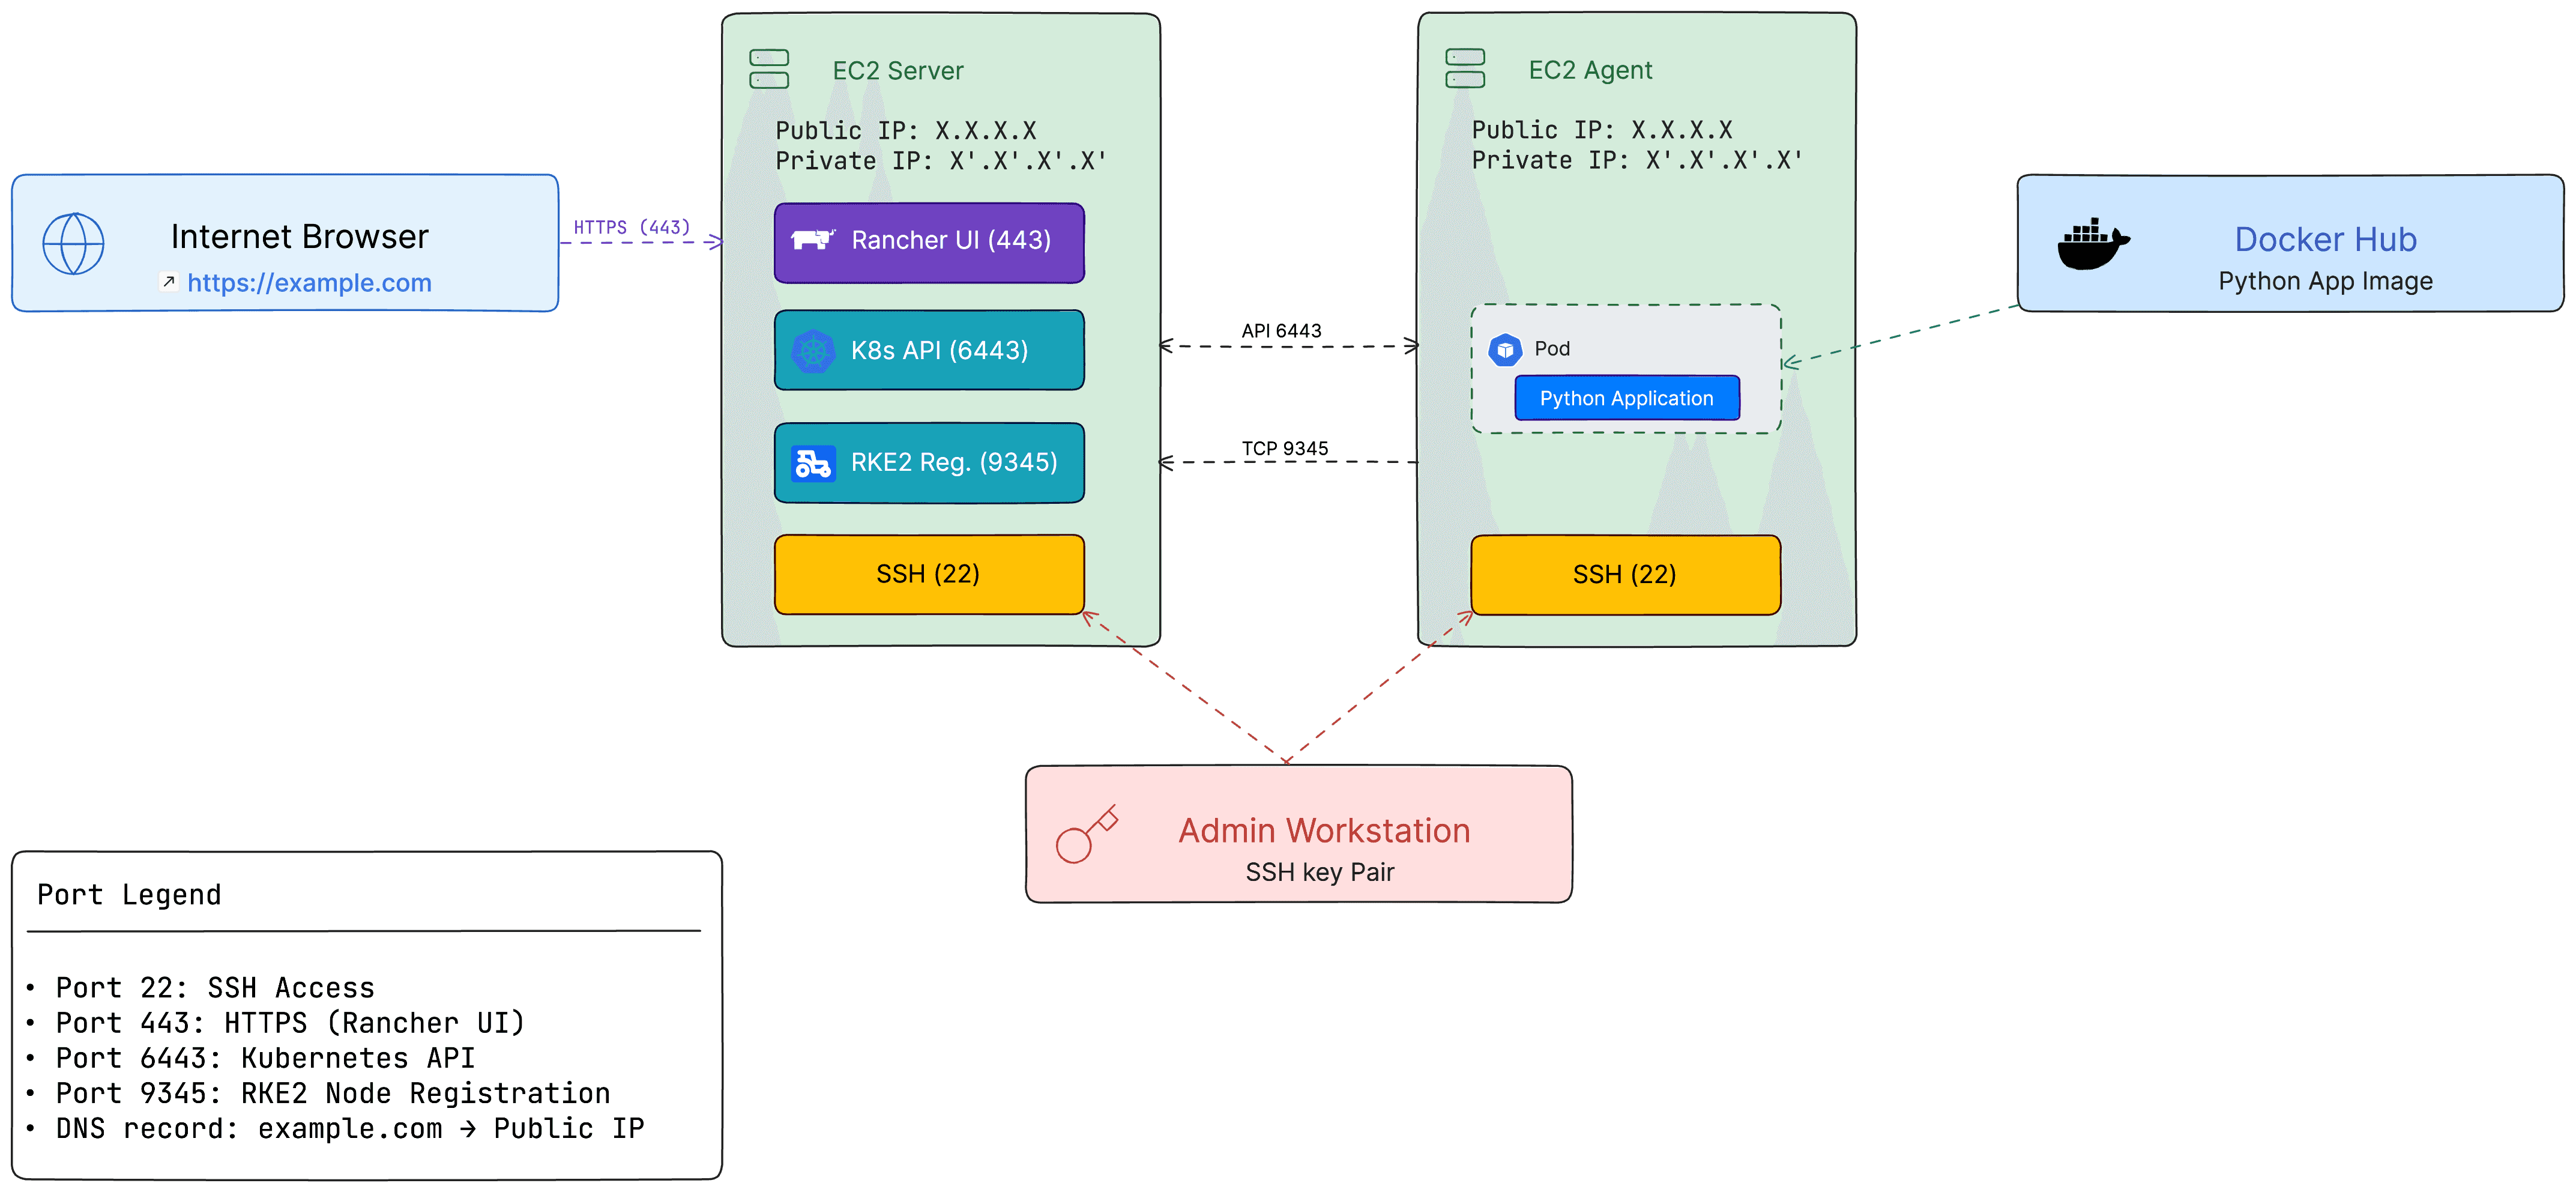
Figure 1: Network communication flow between RKE2 server, agent, and external services

Figure 2: Rancher dashboard showing both server and agent(worker) nodes successfully joined to the cluster
Week 4: Installing Rancher with Helm and Developing the Python App
Having the Kubernetes cluster, I had two main tasks for week 4: installing Rancher on the cluster and developing the Python application that I would eventually deploy.
Installing Rancher Management Interface
The first part of week 4 focused on setting up the cluster management interface. I SSH'ed into the server node and set up Helm (the Kubernetes package manager).I needed to install Helm, add the necessary repositories, and install cert-manager before installing Rancher itself.
First, I installed Helm:
Then I added the required Helm repositories:
Next, I installed cert-manager, which is required for Rancher's TLS certificate management:
Finally, I installed Rancher itself:
(Where rancher.example.com was the DNS name used, pointing to the Elastic IP of the server.) Rancher's docs mention that on RKE2 clusters, an Ingress controller comes pre-installed (so there's no need to add one manually). This meant as soon as the Helm chart applied, an Ingress pointed the DNS name at Rancher's service. I waited a few minutes for the pods to become healthy.
Finally, my instructor pointed the DNS record rancher.example.com to the EC2's Elastic IP that I had set up earlier. Having that stable IP made the DNS configuration straightforward. When I navigated to https://rancher.example.com, I saw the Rancher login page! That was a big win – Rancher was up. The local cluster (my RKE2 cluster) appeared under Cluster Management. At this point, Rancher acted as a nice dashboard over the cluster I'd built.
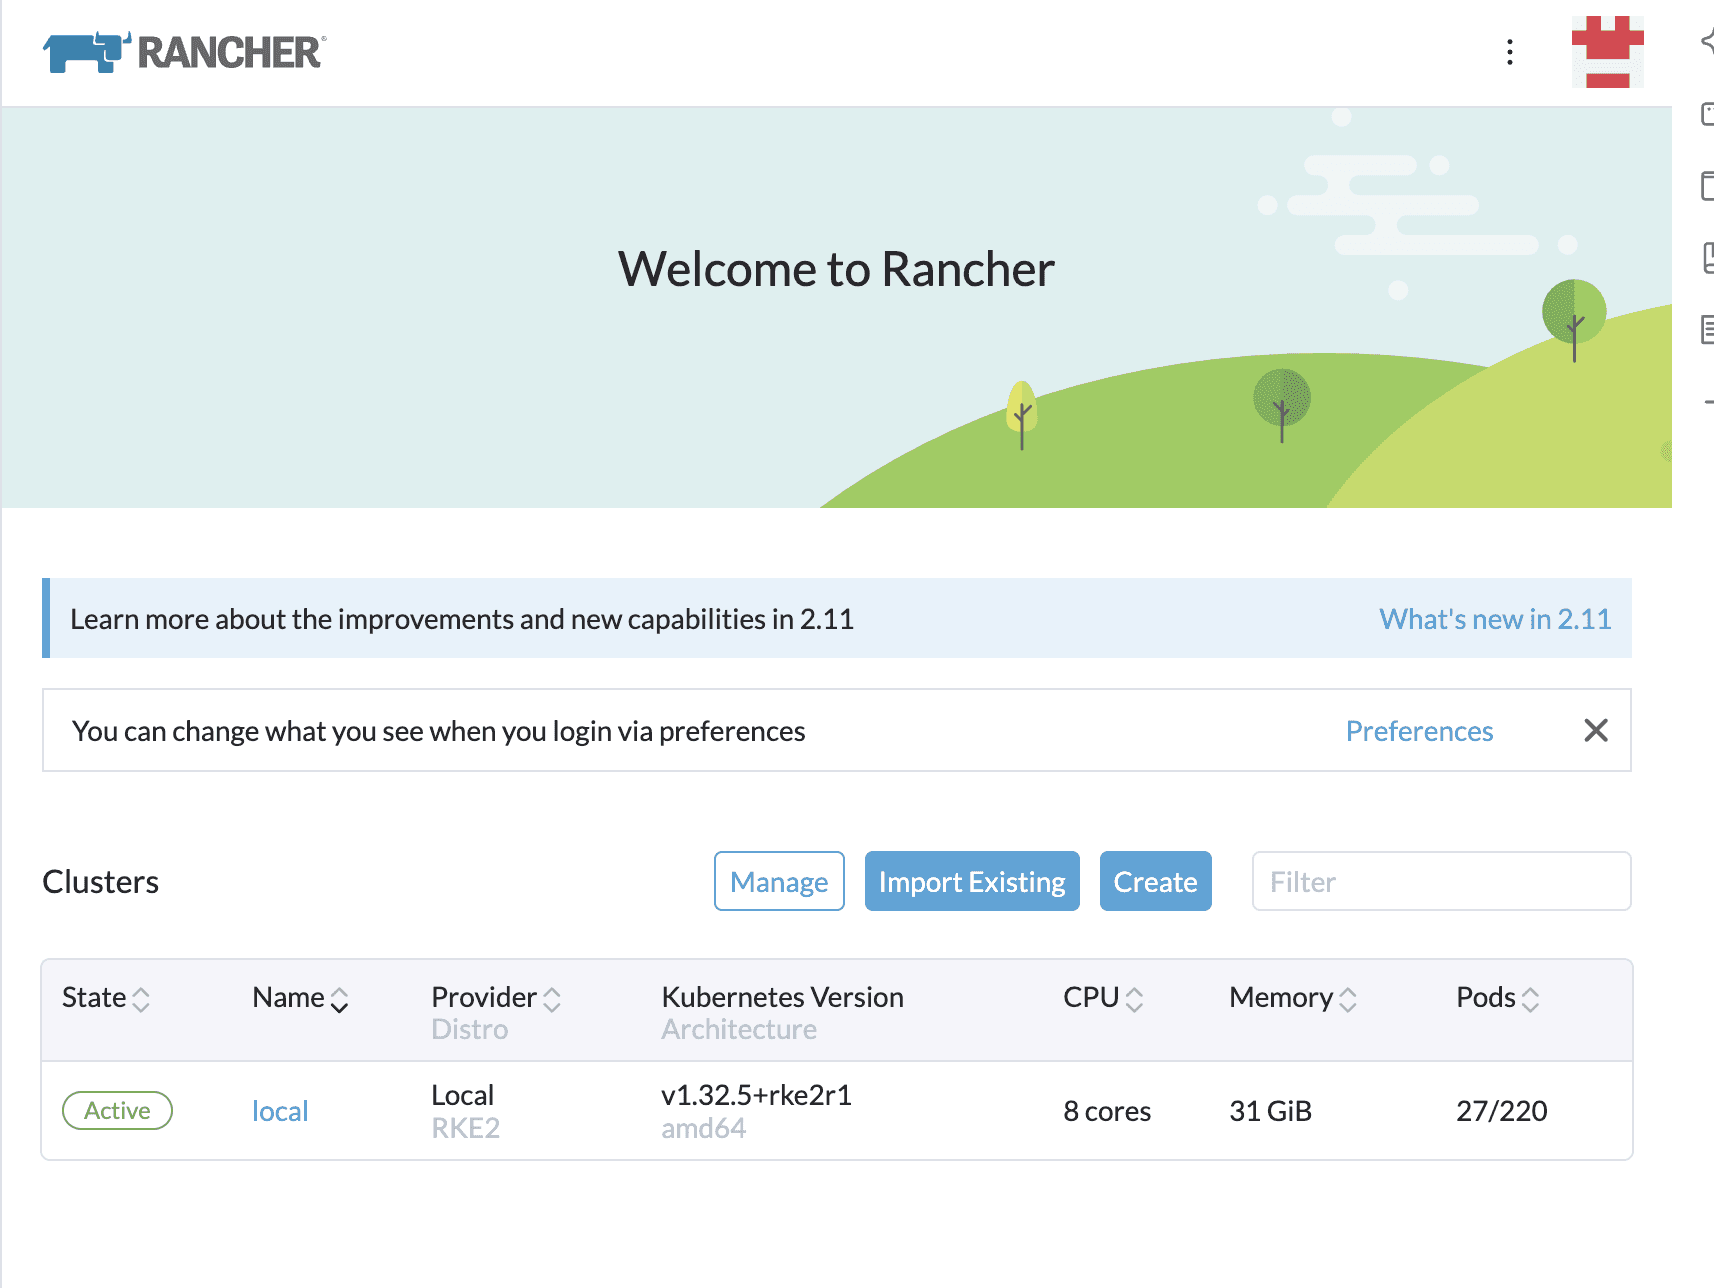
Figure 3: Rancher cluster management interface showing the local RKE2 cluster
Developing the Python Quotes Application
The second part of week 4 involved actually coding the Python application that would become the centerpiece of my deployment. Using VSCode as my IDE, I created a simple quotes application that would fetch quotes from an API (reference here). Following the provided reference materials, I built out the core functionality:
Created quotes.py with the main application logic, using a for loop instead of an infinite while loop to make it more manageable
Developed a requirements.txt file listing all the necessary Python dependencies
Tested the application locally on my computer to ensure it worked correctly before moving to deployment
This was an important step in understanding the full development lifecycle; you need working code before you can containerize and deploy it. Once I had the application running locally and was satisfied with its functionality, I organized the files in a directory structure, committed them to Git, and pushed to my branch on the project GitHub repository.
Week 5: Building and Containerizing the Python App
Week 5 was supposed to be the culmination of everything I'd learned, taking my Python application and deploying it to the Kubernetes cluster I'd spent weeks building. What I didn't expect was that this simple deployment would turn into an intensive debugging bootcamp that taught me more about Docker, Git, and production workflows than a tutorial ever could.
The Missing Pieces
I fired up my EC2 server, ready to containerize the Python quotes application I had developed in the second part of Week 4, only to discover a fundamental problem: the files weren't there. I had them locally on my computer and in the GitHub repository but not on the server. This was my first lesson in assumptions, I had expected my application code to magically appear on the server. But of course, I'd never actually pulled the project GitHub repository onto the EC2 instance to get the files on the server.
The solution seemed straightforward until I hit GitHub's authentication wall. When I tried the usual git clone approach and tried to authenticate with my password, I was greeted with a firm rejection: "Support for password authentication was removed on August 13, 2021." This wasn't just an inconvenience: it was GitHub's security evolution in action. I needed to generate a Personal Access Token and use it for authentication. With my files finally on the server, I was ready to start containerizing.
Docker Adventures and Discoveries
Creating the Dockerfile felt like writing a recipe for my application. I specified the Python base image, set up the working directory, copied my requirements, and defined how to run the app.
But when I tried my first build after installing docker on the server,
Docker threw an error that seemed obvious in hindsight: I'd forgotten the build context (that crucial "." at the end that tells Docker what files to include).
It's one of those mistakes you make once and never forget. The real adventure began when I started testing my containerized application. My Python script seemed to hang forever, and I couldn't figure out why. The first culprit was embarrassingly simple: my script had time.sleep(60) between API calls, making each test cycle painfully slow. A quick change to time.sleep(7) made development much more bearable.
But even after fixing the sleep time, something was still off. When I finally let the application run to completion, I discovered I was hitting the quotes API too aggressively and getting HTTP 429 "Too Many Requests" responses. This was my introduction to real-world API constraints: rate limiting isn't just a concept in documentation, it's a daily reality. The solution was patience and respect for the API's limits: longer delays between requests and graceful handling of rate limit responses.
Perhaps the most confusing issue was when my Docker container seemed to "hang" after running. I'd press Ctrl+C and suddenly see all the quotes appear. It turned out the container wasn't hung at all, it had completed successfully but was just buffering output. This taught me about container lifecycle management and the importance of understanding what "completion" looks like for different types of applications.
The Caching Conundrum
Here's where things got really interesting. I made changes to my Python code, reducing the sleep time, but when I tested the Docker image, it was still using the old 60-second delays. This was my crash course in Docker's layer caching system. Docker images aren't dynamic: they're snapshots taken at build time. When I changed my source code, the existing image still contained the old version. I needed to rebuild:
This forced Docker to start fresh and include my latest changes. It's a fundamental concept that separates containers from traditional development: your container image is a moment frozen in time until you explicitly update it.
Git Growing Pains
With my Docker image working perfectly, I felt confident pushing my changes to GitHub. That's when I encountered the 133MB wall. My Docker export file (quotes-app.tar) exceeded GitHub's 100MB file size limit, and my push was rejected. This led to a valuable lesson about repository hygiene. Large binary files like Docker images don't belong in Git repositories. I added a .gitignore file to prevent future accidents.
But the damage was done, the large file was already in my Git history. Even after removing it, Git was still trying to push the entire history, including the problematic commit. I had to take more drastic action:
This rolled back my commits, removing the large file from history entirely. Then I used a force push to overwrite the remote branch with my cleaned-up version.
The reset came with an unexpected consequence: I'd accidentally removed my recently created Dockerfile and manifest.yaml because they only existed in the commits I'd just deleted. But by this point, I understood these files well enough to recreate them quickly: sometimes losing work teaches you more than keeping it.
Kubernetes Success
With all the Git drama resolved, I finally deployed my application to Kubernetes. Creating the deployment manifest felt like writing instructions for a very smart robot:
The manifest told Kubernetes exactly how to run my Docker image: how many copies to run, which image to use, and how to manage the application lifecycle. When I applied it with kubectl apply -f manifest.yaml, I watched my containerized Python application come alive in the cluster.
Seeing my application running in Rancher's web interface was incredibly satisfying. What had started as a simple Python script was now a containerized application running on a production Kubernetes cluster, complete with automatic restart capabilities and scaling potential.
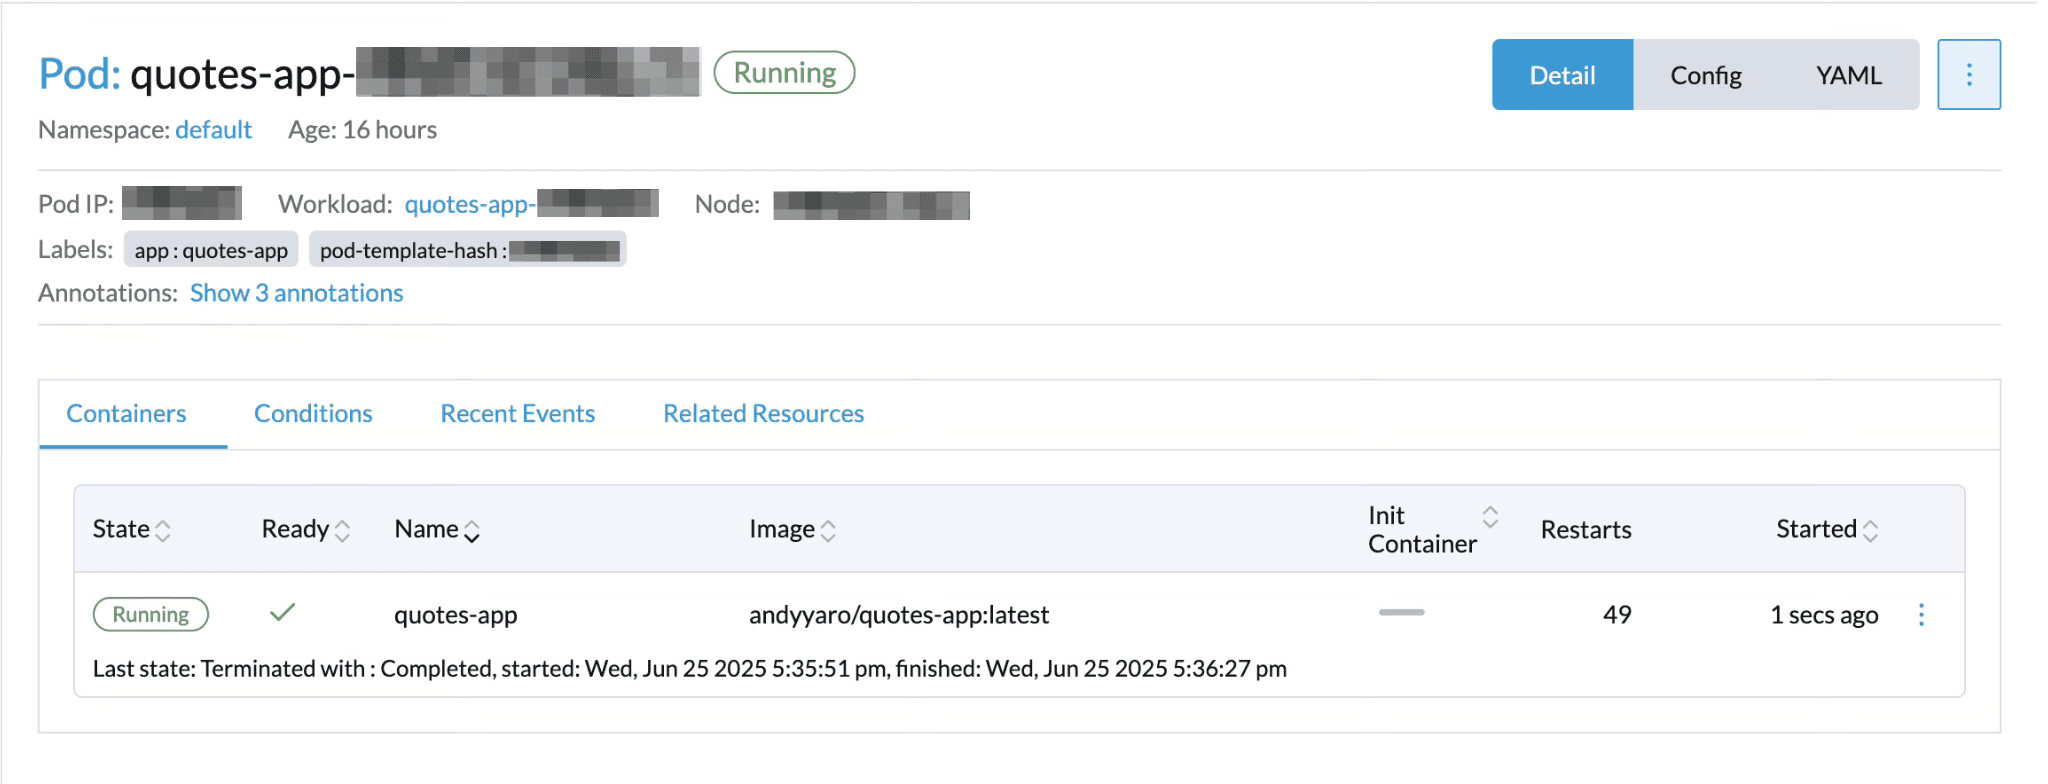
Figure 4: Python quotes application pods running successfully in the Rancher interface

Figure 5: Application logs showing the Python quotes script fetching and displaying quotes
The Real Lessons
This week taught me that production deployment is as much about process as it is about technology. Every issue I encountered, authentication, caching, file management, API rate limits, were real challenges that developers face daily.
I learned to approach problems systematically: test the Python script alone, then the Docker build, then the Kubernetes deployment. When something breaks, isolate the component and debug it individually rather than trying to fix everything at once.
Perhaps most importantly, this experience emphasized that making mistakes isn't failure: it's education. Each error message became a clue, each failed attempt taught me something new about how these systems work together.
The Complete Pipeline
By the end of the week, I had built something remarkable: a complete CI/CD pipeline that took my Python application from source code to running containers in a Kubernetes cluster. The path included:
Source code management with Git and GitHub
Container packaging with Docker and Docker Hub
Orchestration with Kubernetes and Rancher
Production monitoring and management (via Rancher's built-in tools)

Figure 6: Complete development pipeline from source code to production deployment
This had evolved into something much more significant: it was a real application running on real infrastructure, using the same tools and processes that power applications at major companies. The best part? Everything was automated and reproducible. I could tear down the entire deployment and rebuild it with a few commands, or scale it up to handle more traffic as needed.
That's the power of modern cloud-native development, and now I had hands-on experience with every piece of the puzzle.
Reflections and Next Steps
Looking back, it's amazing to see the path from basic AWS knowledge to a working Kubernetes deployment. I started with AWS Cloud Practitioner and AI Practitioner certifications under my belt, but this was my first hands-on implementation. Along the way, I learned how to practically apply concepts like key pairs and security groups for EC2 access, how to install and join nodes in an RKE2 cluster, how to develop a Python application with proper project structure, and how Rancher (via Helm) can give a friendly interface on top. I also got hands-on with Docker: writing a Dockerfile, building images, and pushing to Docker Hub, which is crucial for any cloud-native workflow.
As a beginner, I found the project breaking into weekly goals really helped. Each step (from spinning up VMs to writing YAML manifests) became more understandable.
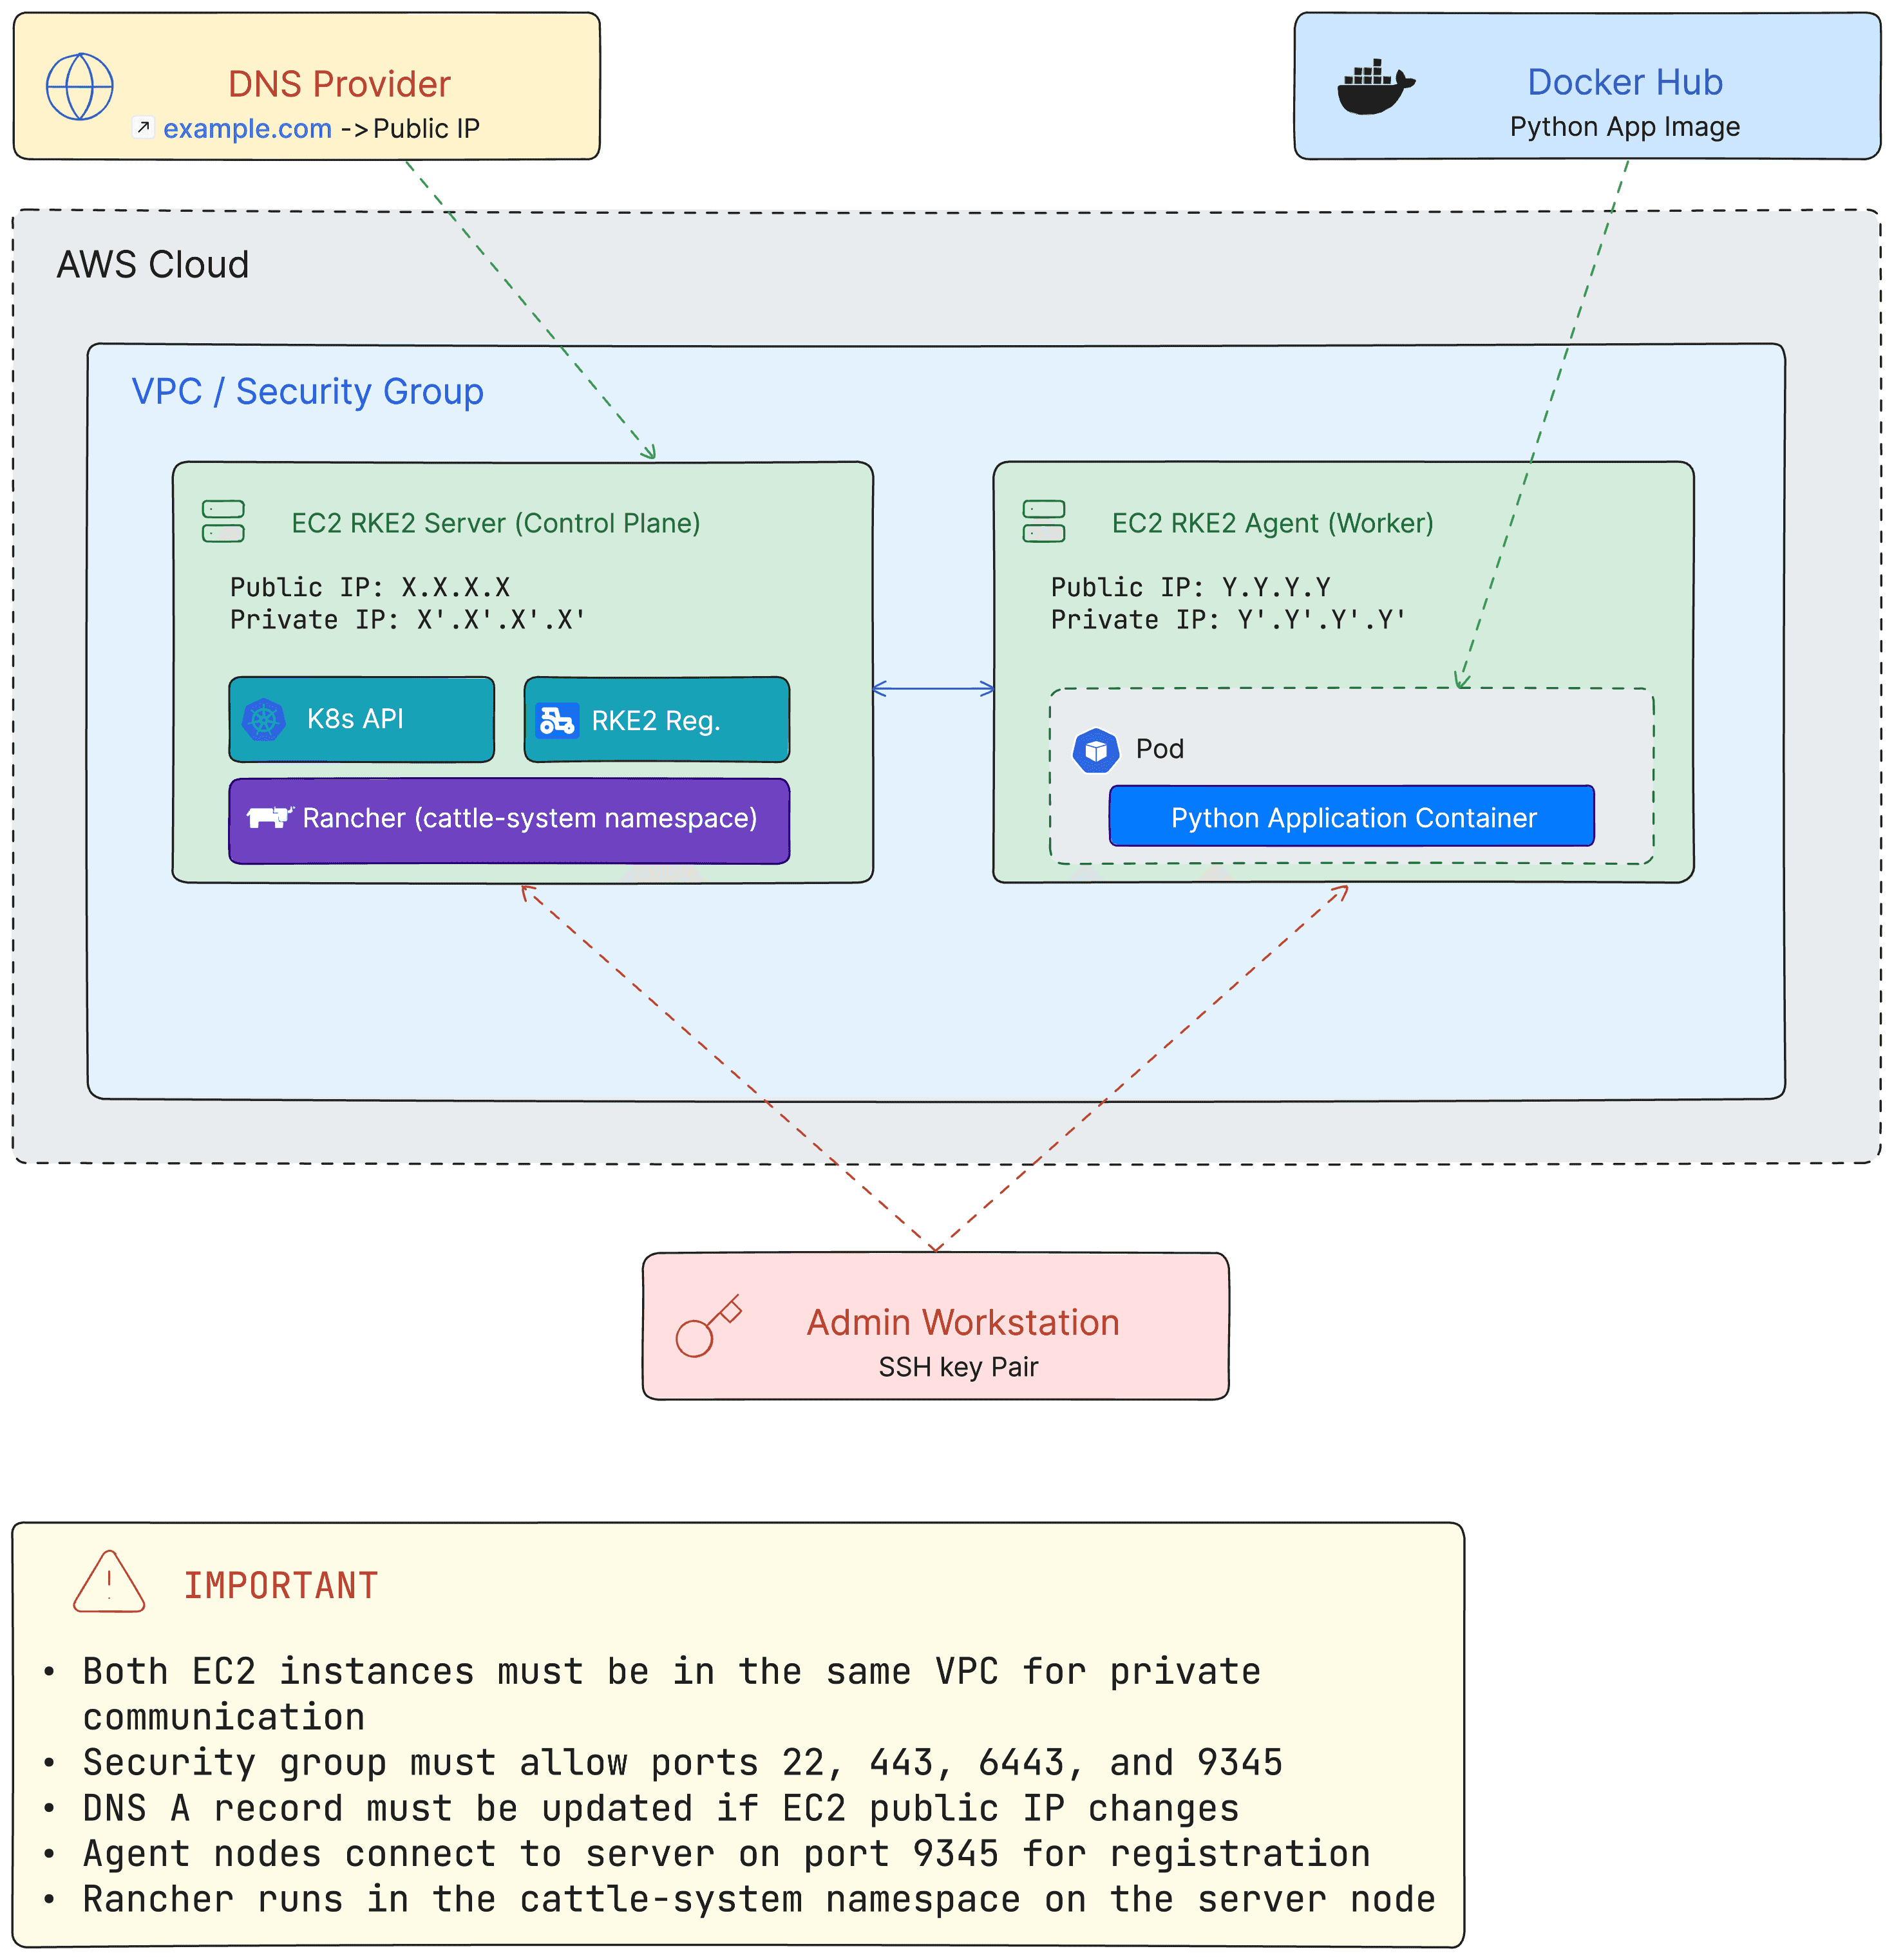
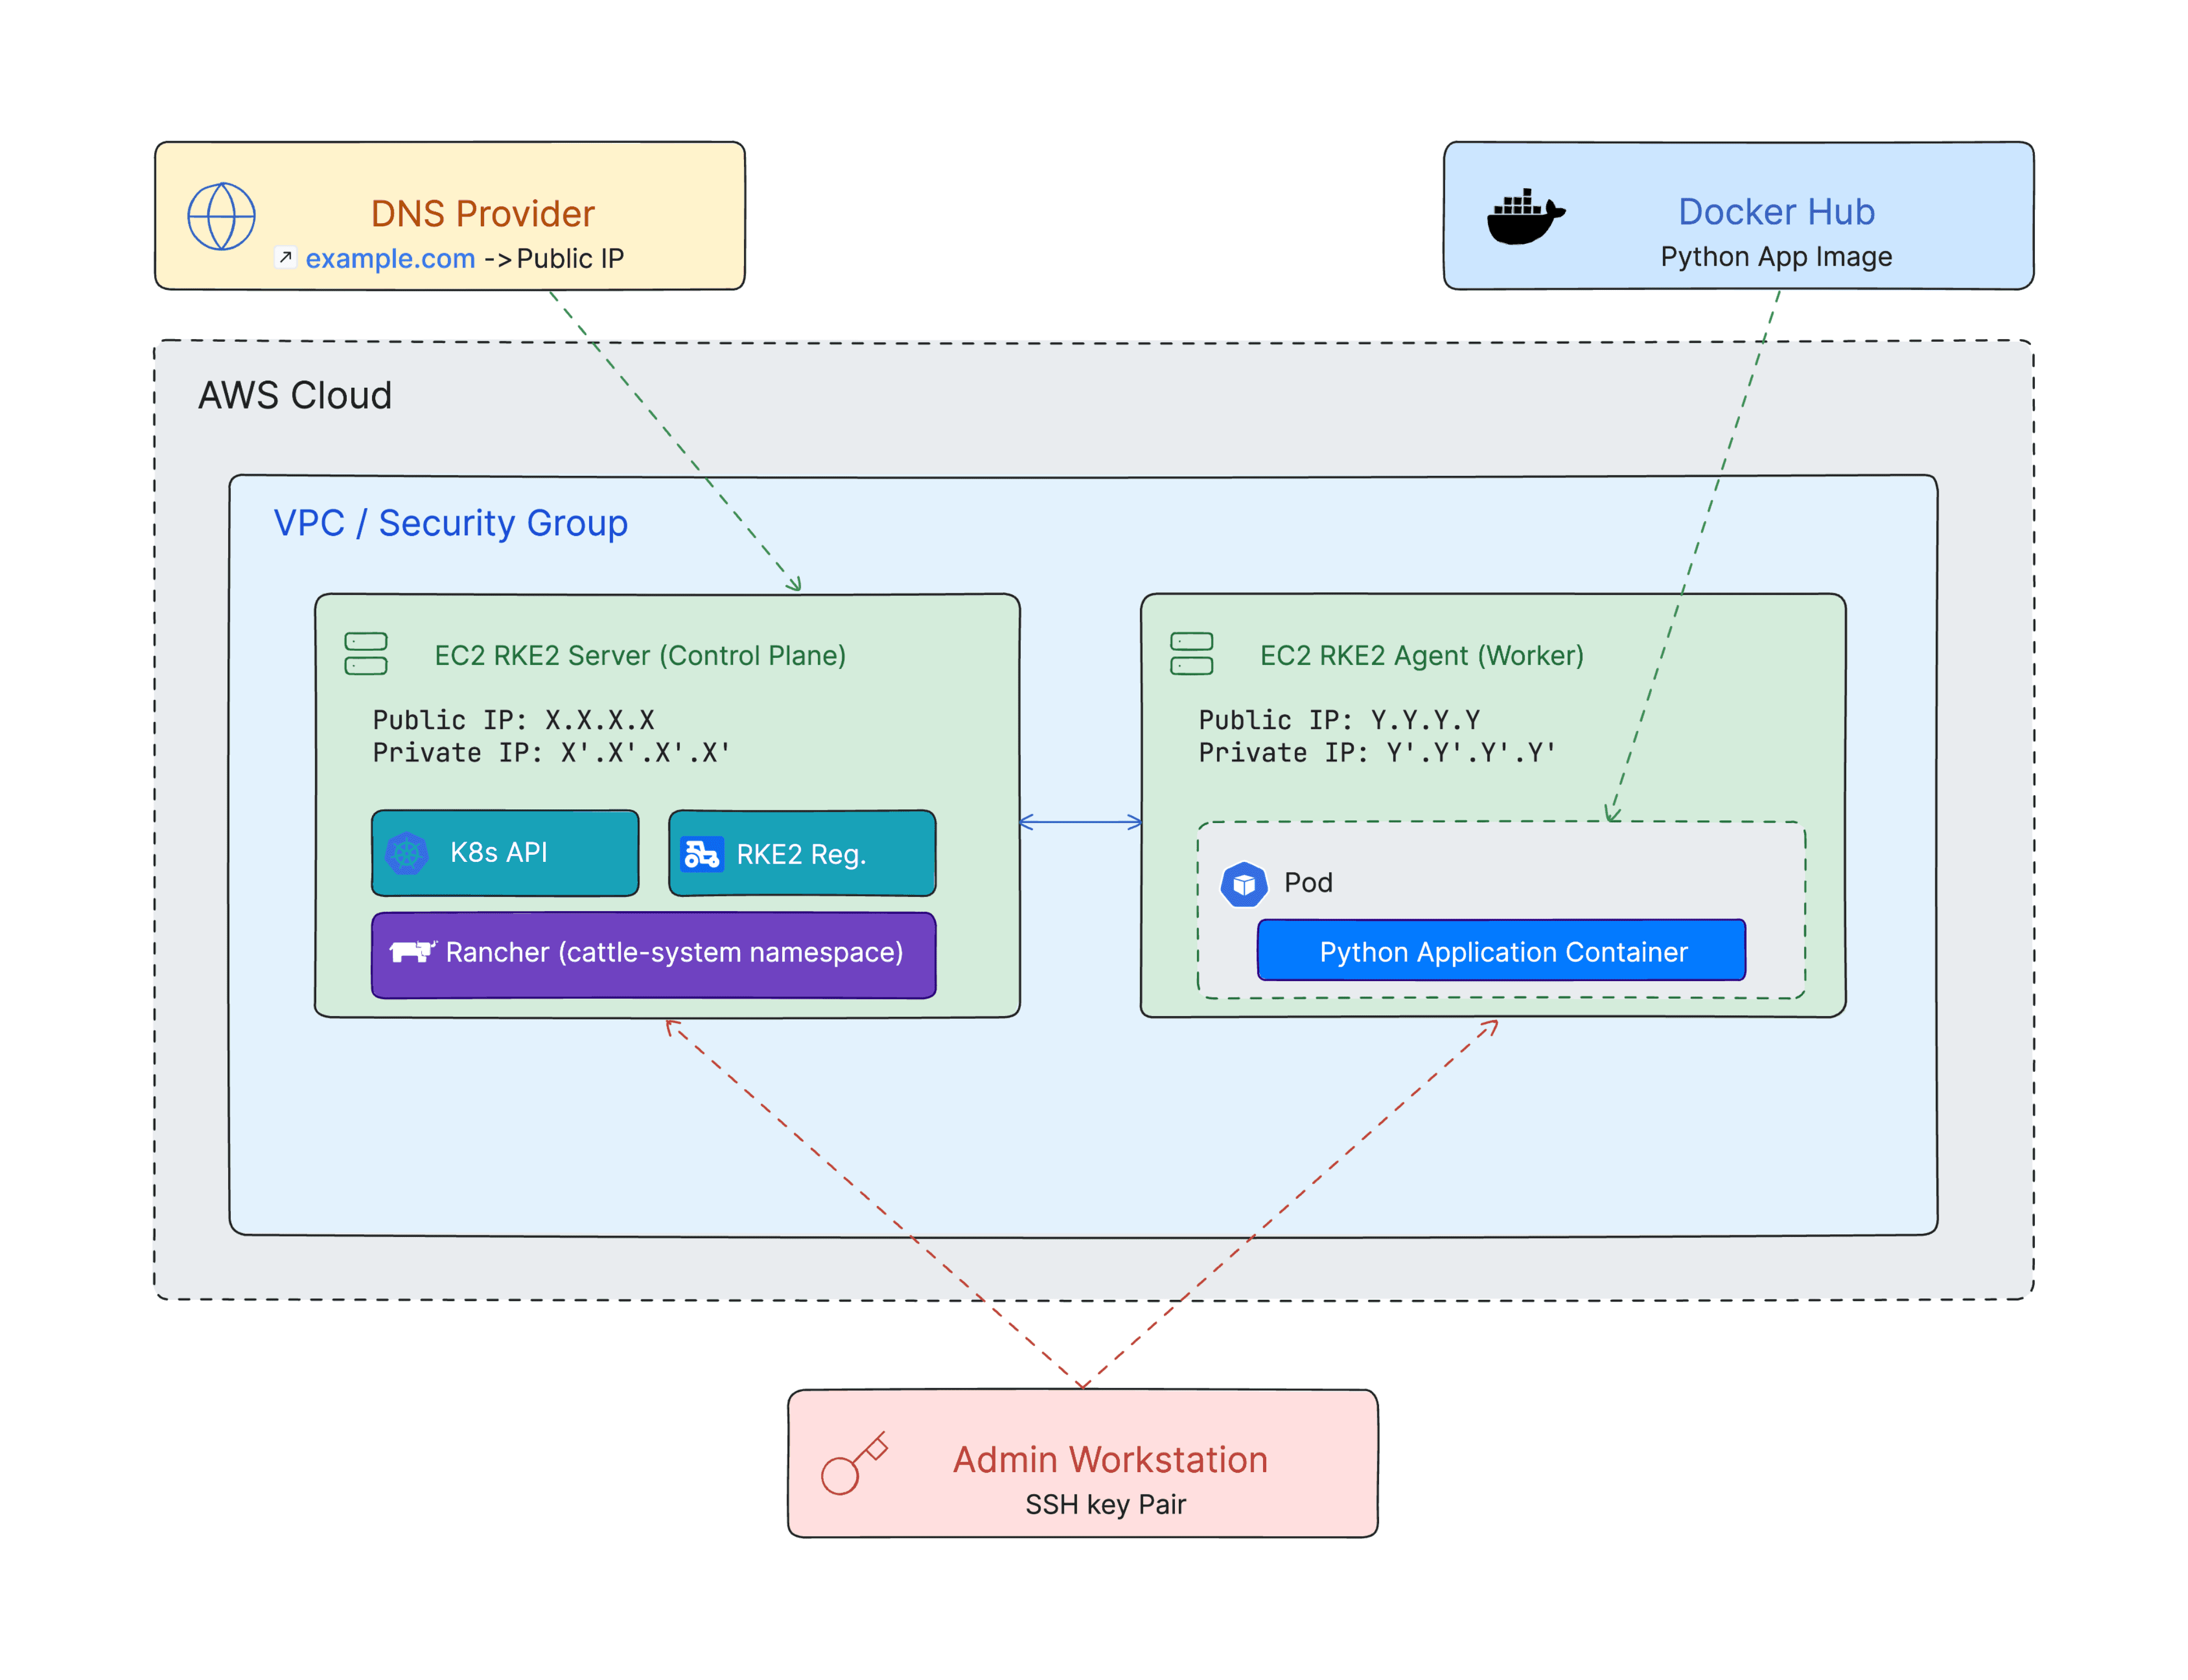
Figure 7: Complete architecture overview of the final deployment
In the future, I might look at deploying a real web frontend alongside the API, or even learning about Helm charts for packaging my app. I'd also like to explore more Kubernetes features (scaling, monitoring). But for now, I'm proud: I learned enough to confidently say I have Kubernetes, RKE2, Rancher, and AWS on my resume.
Next Steps: I plan to continue tinkering, maybe use this same cluster architecture to try out Kubeflow or set up continuous deployment. Having already completed my AWS Cloud Practitioner certification, I now feel much more confident about implementing cloud solutions in practice. The hands-on experience really reinforced the theoretical knowledge I gained during my certification studies. Overall, this summer project, part of a research internship, turned a steep learning curve into a clear path. I went from having basic AWS knowledge to being able to build and explain a complete cloud-native deployment, quite a journey from where I started!
