My Cloud Resume Challenge
Jun 23, 2025
|
21
min read

TL;DR
In two coffee-fueled weeks I completed the 16-step Cloud Resume Challenge, pushing it further with a multi-account AWS Organization. I built a private S3-hosted résumé site fronted by CloudFront, secured with ACM TLS and Route 53 DNSSEC. A Lambda + API Gateway backend writes visitor counts to DynamoDB. Everything is codified in Terraform and deployed via GitHub Actions; Playwright smoke tests run on every push. Key services touched: Organizations, IAM Identity Center, S3 Access Points, CloudFront, Route 53, ACM, Lambda, API Gateway, DynamoDB, KMS, Budgets. Biggest lessons: cross-account permissions are tricky (Access Points beat ACLs), least-privilege IAM matters, automation saves time, and DNSSEC adds trust. The result is a globally cached, fully automated, penny-price cloud portfolio I can demo and tear down at will.
Cloud Resume Challenge: A Two-Week Journey of Learning and Building
Two weeks, lots of coffee, and countless AWS documentation pages later, I have completed the Cloud Resume Challenge – a popular 16-step project designed to provide valuable hands-on skills to cloud "newbies" but also anyone looking to hone their cloud skills. In this blog post, I’ll share my journey through the challenge, blending personal storytelling with technical insights. As a rising sophomore in cybersecurity engineering, after earning the AWS Cloud Practitioner and AI Practitioner certifications, I was eager to get hands-on experience beyond exam prep. The Cloud Resume Challenge offered exactly that: a structured yet flexible roadmap to build a cloud-based resume website from scratch, covering everything from front-end web design to back-end development and DevOps. What follows is how I discovered the challenge, the hurdles I faced (there were plenty!), the solutions I crafted, and the lessons I learned along the way.
Phase 1: Getting Started & Motivation
I come from an academic background in cybersecurity, but theory only takes you so far. After passing the AWS Cloud Practitioner (and an AI Practitioner) cert, I felt a strong urge to apply that knowledge to a real project. That’s when I stumbled upon the Cloud Resume Challenge, created by AWS hero Forrest Brazeal. The challenge’s premise immediately hooked me: it promised a practical way to showcase cloud skills by building a serverless resume website on AWS. As someone aspiring to break into cloud engineering, this sounded like the perfect opportunity to bridge the gap between certification and real-world experience.
What drew me in was the challenge’s holistic nature. It wasn’t just “deploy a website” or “write a Lambda” – it was all of it, end-to-end. I would get exposure to HTML/CSS, set up AWS services, connect a database, and automate the whole thing with Infrastructure-as-Code and CI/CD. The structured 16 steps gave a general roadmap, but there was plenty of room for creativity and exploration. In fact, I decided early on to add some extra twists of my own, such as using a multi-account AWS environment for more realism and implementing security enhancements like DNSSEC. I knew it wouldn’t be easy, but that was the point. With excitement (and a bit of nerves), I set out to build my cloud resume, ready to turn my textbook knowledge into tangible skills.
Phase 2: Setting Up the Foundation
Every good project needs a solid foundation. In my case, that meant wrangling AWS accounts and identity management before writing a single line of code. Rather than doing everything in one account with root user (tempting, but bad practice), I embraced a multi-account AWS Organization setup. I created a fresh AWS Organization and set up separate accounts for different roles: one for Management (holding shared resources like DNS), one for Dev (Sandbox), another one for Test/Backend (to host backend resources) and one for Prod (to host the front-end in production). This might sound overkill for a personal project, but I wanted to simulate an enterprise environment and enforce isolation between components (plus, it was a great learning exercise in AWS Organizations).
With multiple accounts in play, I configured AWS IAM Identity Center (formerly AWS SSO) for centralized access management. This wonderful resource shared in the Cloud Resume Challenge guidebook helped me achieve this part. I created users (one per account for simplicity, using email aliases) and permission sets to define their permissions. Here I ran into my first mini-challenge: misunderstanding how permission sets differ from ordinary IAM policies. I mistakenly kept creating separate permission sets for each account and task, treating them like individual policies. After some confusion, I learned that a permission set is actually a collection of IAM policies that can be reused, essentially a role template that AWS SSO uses to provision an IAM role in each target account. Once I grasped that, I consolidated my permission sets (instead of one-off sets for every single permission) and assigned the appropriate set to each user-account combination. This allowed me to log into any account through a single SSO portal:
, assume a role with the needed permissions, and even configure CLI access via :
and get

Of course, Multi-factor authentication (MFA) was enabled by default for SSO, which gave me confidence that my accounts were secured from the get-go.
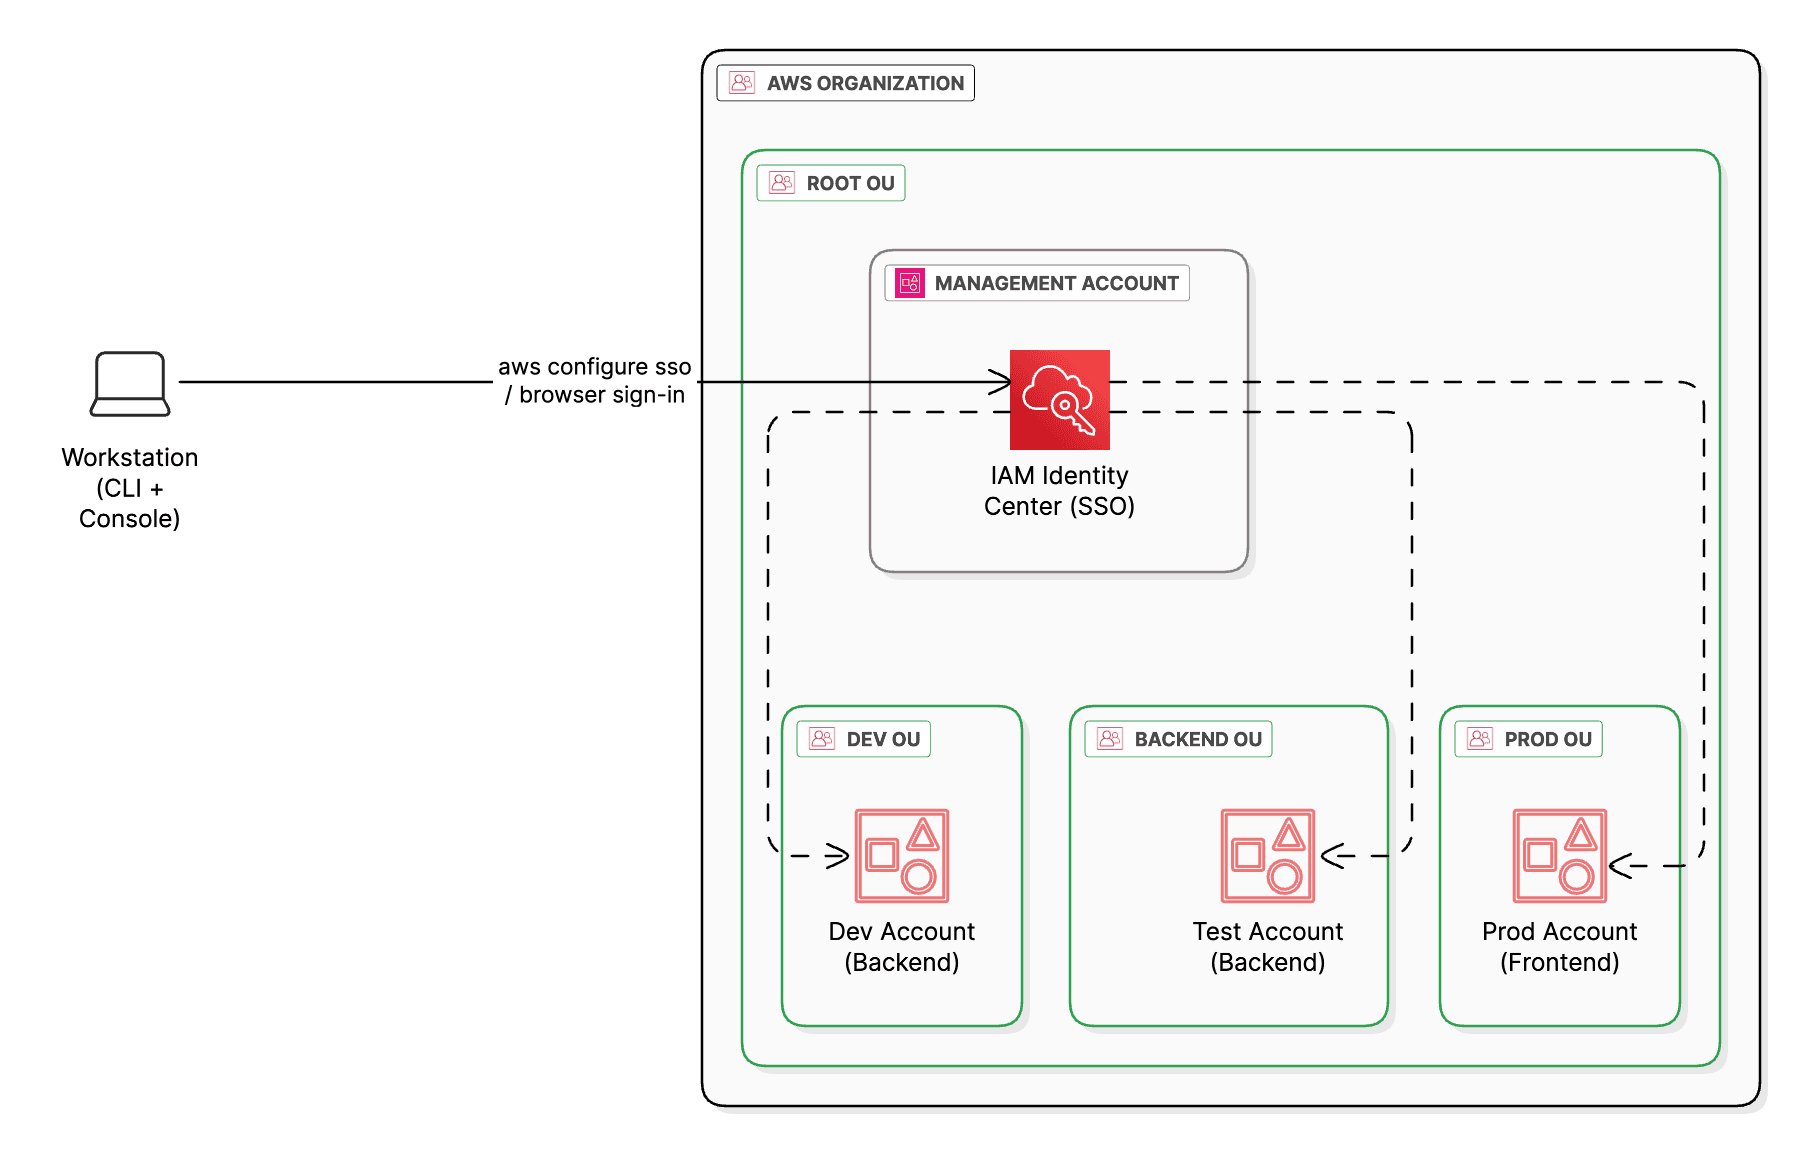
Setting all this up was a learning curve, at times I felt I was doing “cloud admin” work more than the actual project! But in hindsight it was time well spent. I gained familiarity with AWS Organizations, service control policies, and the principle of least privilege across accounts. The key takeaway: spending a day or two on proper identity and account structure can save many headaches later. With my environment ready and my cross-account access configured, I was poised to tackle the challenge’s first technical chunk: the front-end resume itself.
Phase 3: Frontend & Hosting the Resume
I dusted off my front-end skills (I was just about to acquire some to be frank) and began crafting a simple HTML/CSS resume/portfolio page – the content that would showcase my background and projects. The plan was to host this page html file on Amazon S3 and serve it through CloudFront as a site for CDN caching and HTTPS. Sounds straightforward, right? Well, it turned out to be far more complex than I anticipated, largely because of my multi-account setup. My static website bucket lived in my Dev/Test account, but the CloudFront distribution and the custom domain DNS in Route 53 would live in other accounts. Getting these to talk to each other securely sent me down a rabbit hole of AWS permissions and workarounds.
First I set up an S3 bucket in Test account → a custom domain in Management account → CloudFront in Prod account. The challenge: making them work together across accounts. But CloudFront needed permission to access the S3 bucket’s contents, and doing this across accounts became an adventure in troubleshooting.
Attempt 1: I tried using a cross-account IAM role. I created a role in the Management account that allowed full access to CloudFront, Route 53, S3, and ACM (for certificates), trusting any principal in my Organization (org-wide access) to assume it. The idea was to assume this role from the Test account and create the CloudFront distribution and DNS record pointing to the bucket. This approach failed spectacularly: I misunderstood how cross-account roles work. When you assume a role in another account, you discard your original identity’s permissions (your credentials are not the same no more) and only get the target role’s permissions (like entering someone else’s house, you can use their stuff, but you left your own keys behind). I found myself “in” the Management account with rights to create CloudFront and Route 53 records, but with no access to the S3 bucket back in the Test account. My distribution couldn’t fetch the website content. Lesson learned: cross-account IAM roles won’t magically grant combined access to two accounts at once; the assumed role’s account context is all that matters.
Attempt 2: Next, I focused on the S3 bucket itself. I thought, why not add a bucket policy allowing the role (or distribution) to read the bucket? I updated the bucket’s policy to trust the IAM role from the other account for S3 actions. This likely did grant the needed permissions in principle – however, when I switched to the cross-account role and checked the S3 console, the bucket wasn’t listed at all. I scratched my head until I discovered a nuance: the S3 console only lists buckets in your current account. Even if you have cross-account access, you won’t see the bucket in the GUI (you’d have to use the CLI or APIs to access it). At the time, I interpreted the empty console as “it didn’t work,” not realizing it might have been working behind the scenes. This was a partial success misinterpreted as failure. The takeaway: AWS’s web console can mislead; sometimes you need to verify access with CLI calls or by actually retrieving an object.
Attempt 3: Perhaps an old-school solution would work: S3 Access Control Lists. I enabled ACLs on the bucket (which AWS disables by default now for ownership control) and added the canonical AWS user ID of my other account as a grantee with read access. This approach was a throwback to earlier S3 cross-account practices. Unfortunately, it still didn’t get CloudFront access working. I believe I had the ACL set up correctly (and I ensured “Block Public Access” settings wouldn’t reject the ACL), but something was missing. Much later I discovered the real culprit: by enabling ACLs I had taken the bucket out of Bucket owner enforced mode – which meant S3 was once again evaluating old‑style ACL grants before looking at my shiny new bucket policy and Access Point permissions. Because the canonical‑user grant never included CloudFront’s origin‑access identity, every request coming through the distribution was denied even though the policy itself was fine. The fix turned out to be the exact opposite of what I was trying as I forgot to disable ACLs again. This oversight would come back to haunt me, as you’ll see. At this stage though, ACLs didn’t solve my problem.
Attempt 4: By now I was scouring the AWS forums and docs for any cross-account S3 solutions I hadn’t tried. I stumbled upon a brand-new feature called S3 Access Grants. Access Grants are part of AWS’s AWS IAM Identity Center integration, offering a simplified way to grant data access by mapping S3 bucket prefixes to users or roles (even across accounts) with a broker service handling temporary credentials. It sounded promising (and pretty advanced for a personal project!), so I dove in. I created an Access Grants instance in the Test account where the bucket lives, and set up a grant giving read access to my bucket’s contents. This involved creating another IAM role in the Test account that the Access Grants service could assume (yes, services can assume roles too – that was news to me). I then shared the Access Grants instance to my whole Organization using AWS Resource Access Manager, and gave my cross-account role permission to request access from that instance. In practice, using Access Grants went like this: from the other account needing bucket access, call the S3 Access Grants API to get temporary credentials for the bucket, then use those creds to access the data. Indeed, from the CLI I was able to retrieve an object using the command
which returned short-lived credentials that i would export to environment variables running :
, and then
finally listed the bucket contents! 🎉 It was a victory… kind of. The downside? This method is meant for programmatic access; it doesn’t make the bucket appear in the console and would be complex to integrate into CloudFront. I had proven I could pull data across accounts with Access Grants, but it wasn’t a user-friendly or CloudFront-friendly solution for my website.
By this point I was both desperate and determined. I refused to give up on achieving cross-account access in a clean way. One AWS feature finally came up in my research: S3 Access Points. Access Points are basically specialized endpoints for your S3 bucket that you can create in other AWS accounts, each with its own policy. This sounded like exactly what I needed. So,
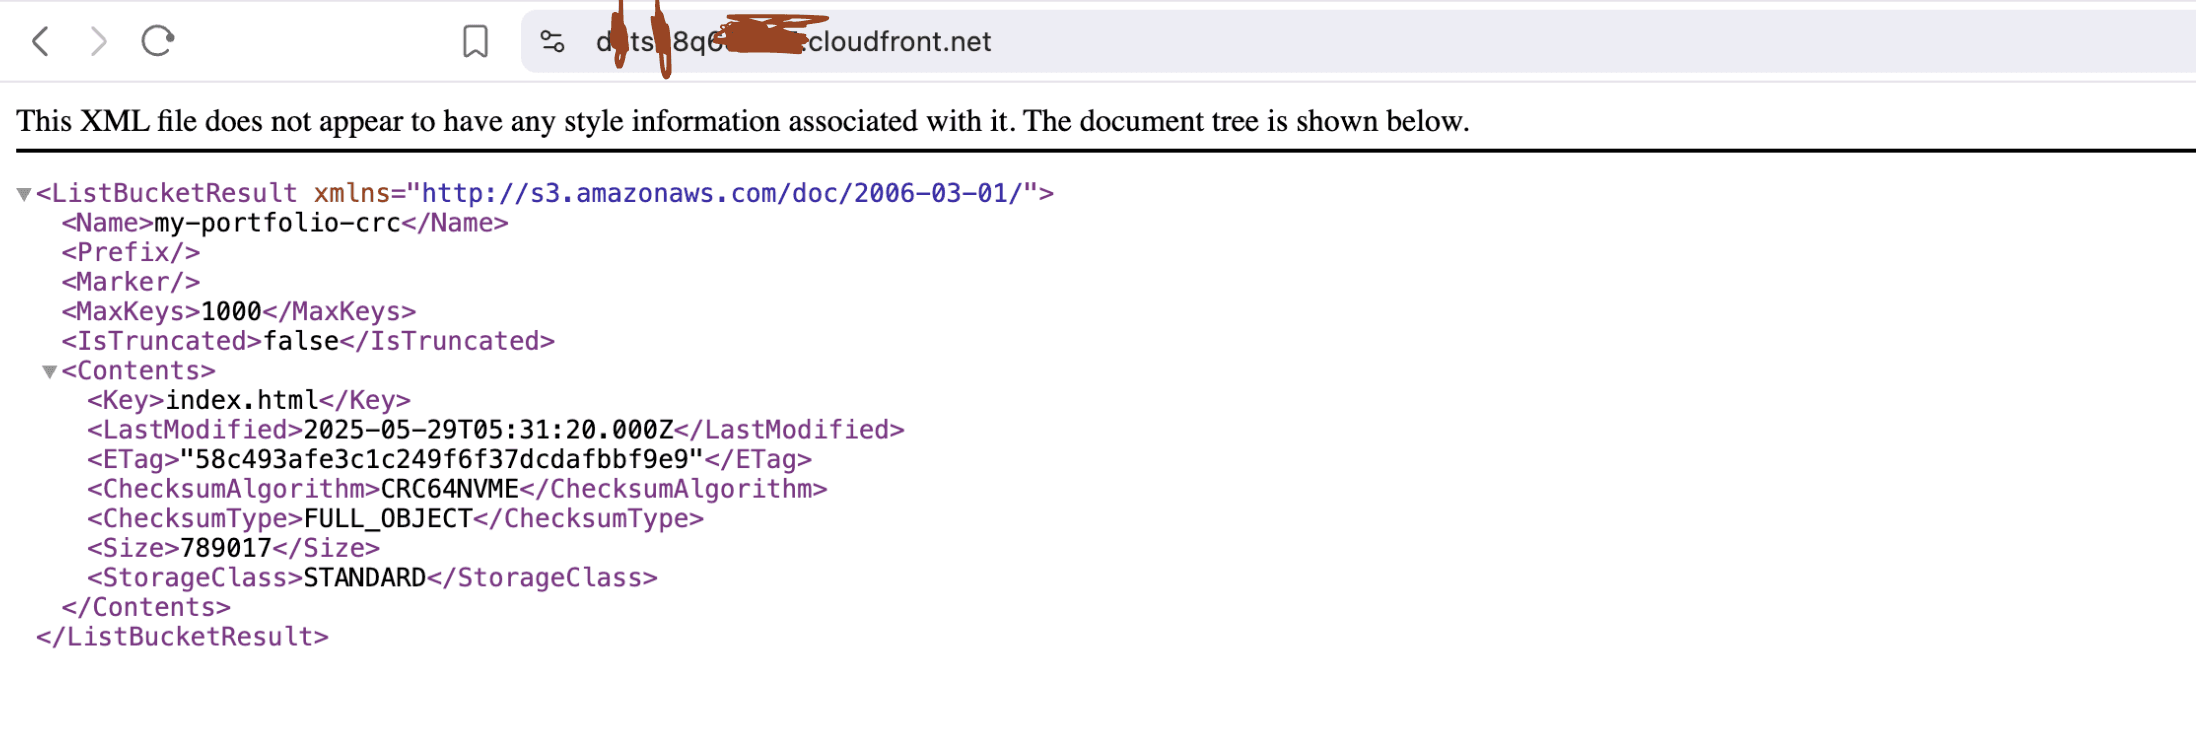
Attempt 5 became the winning strategy: from my Prod (front-end) account, I created an S3 Access Point that references the bucket in the Test/Backend account (you specify the bucket’s ARN and the owning account ID when creating it). I no longer needed a role. This essentially gave my Prod account an alias to reach the external bucket. I then updated the bucket policy in Test to allow that Access Point and the Access Point policy too to allow the CloudFront distribution. Finally, success! Not only could my CloudFront distribution access the bucket via the Access Point, but I even achieved my secret wish: when logged into the Prod account, I could see and browse the bucket’s contents in the S3 console (under the Access Points section). This was something I earlier thought impossible – a bucket from another account visible in my console – but Access Points made it a reality. I practically did a happy dance when I navigated to S3 in the Prod account and saw my new Access Point listing "my-portfolio-crc" index.html object. The note from Attempt 2 now had an exception: you can see cross-account buckets in the console, if you use Access Points!
With the Access Point in place, I proceeded to set up the CloudFront distribution. Instead of pointing CloudFront directly at an S3 bucket, I used the Access Point’s alias as the origin domain (format: access-point-alias.s3.region.amazonaws.com). CloudFront treated it like a normal S3 origin. I requested an SSL/TLS certificate via AWS Certificate Manager for my custom domain and configured CloudFront to use that certificate. Here I hit a small snag: I waited and waited for DNS validation to succeed,

not realizing I needed to create the CNAME record in Route 53 for the ACM validation – once I added that, the certificate issued quickly. I also learned that to use a custom domain with CloudFront, you must explicitly add the Alternate Domain Name (CNAME) in the distribution settings and attach a matching certificate, or Route 53 won’t know about your distribution. In my first attempt, my distribution wasn’t appearing as a target for the Route 53 alias record. The reason? I hadn’t set the alternate domain name on CloudFront yet, and the certificate I had didn’t cover the domain I wanted to use. I corrected that by adding the domain (e.g. myresume.example.com) to CloudFront’s settings and requesting a new ACM cert that covered that name. CloudFront requires a valid TLS cert covering the custom domain to be attached to the distribution – only then can you use the friendly URL in DNS.
After updating the distribution, attaching the proper cert, and creating the Route 53 alias record in my Management account, I hit a different wall: CloudFront listed my bucket (success!) but returned AccessDenied when it tried to fetch "index.html".
Root cause → origin config mismatch:
I had granted CloudFront access to the bucket via the Access Point, but
I hadn’t told CloudFront which object to serve by default.
Fix: in the distribution’s “Default root object” field I entered "index.html".
The error page vanished, just to show another access denied error but different this time:

Instead of my resume page, I got an Access Denied error. This was puzzling since I had been so careful with the policies. I double-checked: the S3 bucket policy allowed the Access Point and the Access Point policy also allowed the CloudFront distribution. CloudFront had a default root object set to index.html. Everything looked right… what could be wrong? I combed through AWS documentation and toggled every setting I could think of, but the error persisted. Frustration was at an all-time high, but so was my determination. I took a deep breath and systematically reviewed every piece of the puzzle. That’s when I noticed it: remember the ACL enabling I did way back in Attempt 3? I had never turned off the bucket’s ACL (ownership controls) after that experiment. The bucket still had ACLs enabled, which wasn’t needed anymore and in fact conflicted with fine-tuned policies. On a hunch, I reverted the bucket to “Bucket owner enforced” (disabling ACLs entirely). Boom – that was it! Suddenly, my custom domain loaded my resume site over HTTPS, complete with the CloudFront distribution caching it globally. It felt incredible to see the page live, knowing how much behind-the-scenes tinkering it took to get there.
Note: You still need to create an Origin Access Control for the CloudFront distribution. Otherwise you will run into this error :

Lesson learned: sometimes an innocuous leftover setting (like an ACL flag) can break things; simplification can be the solution.

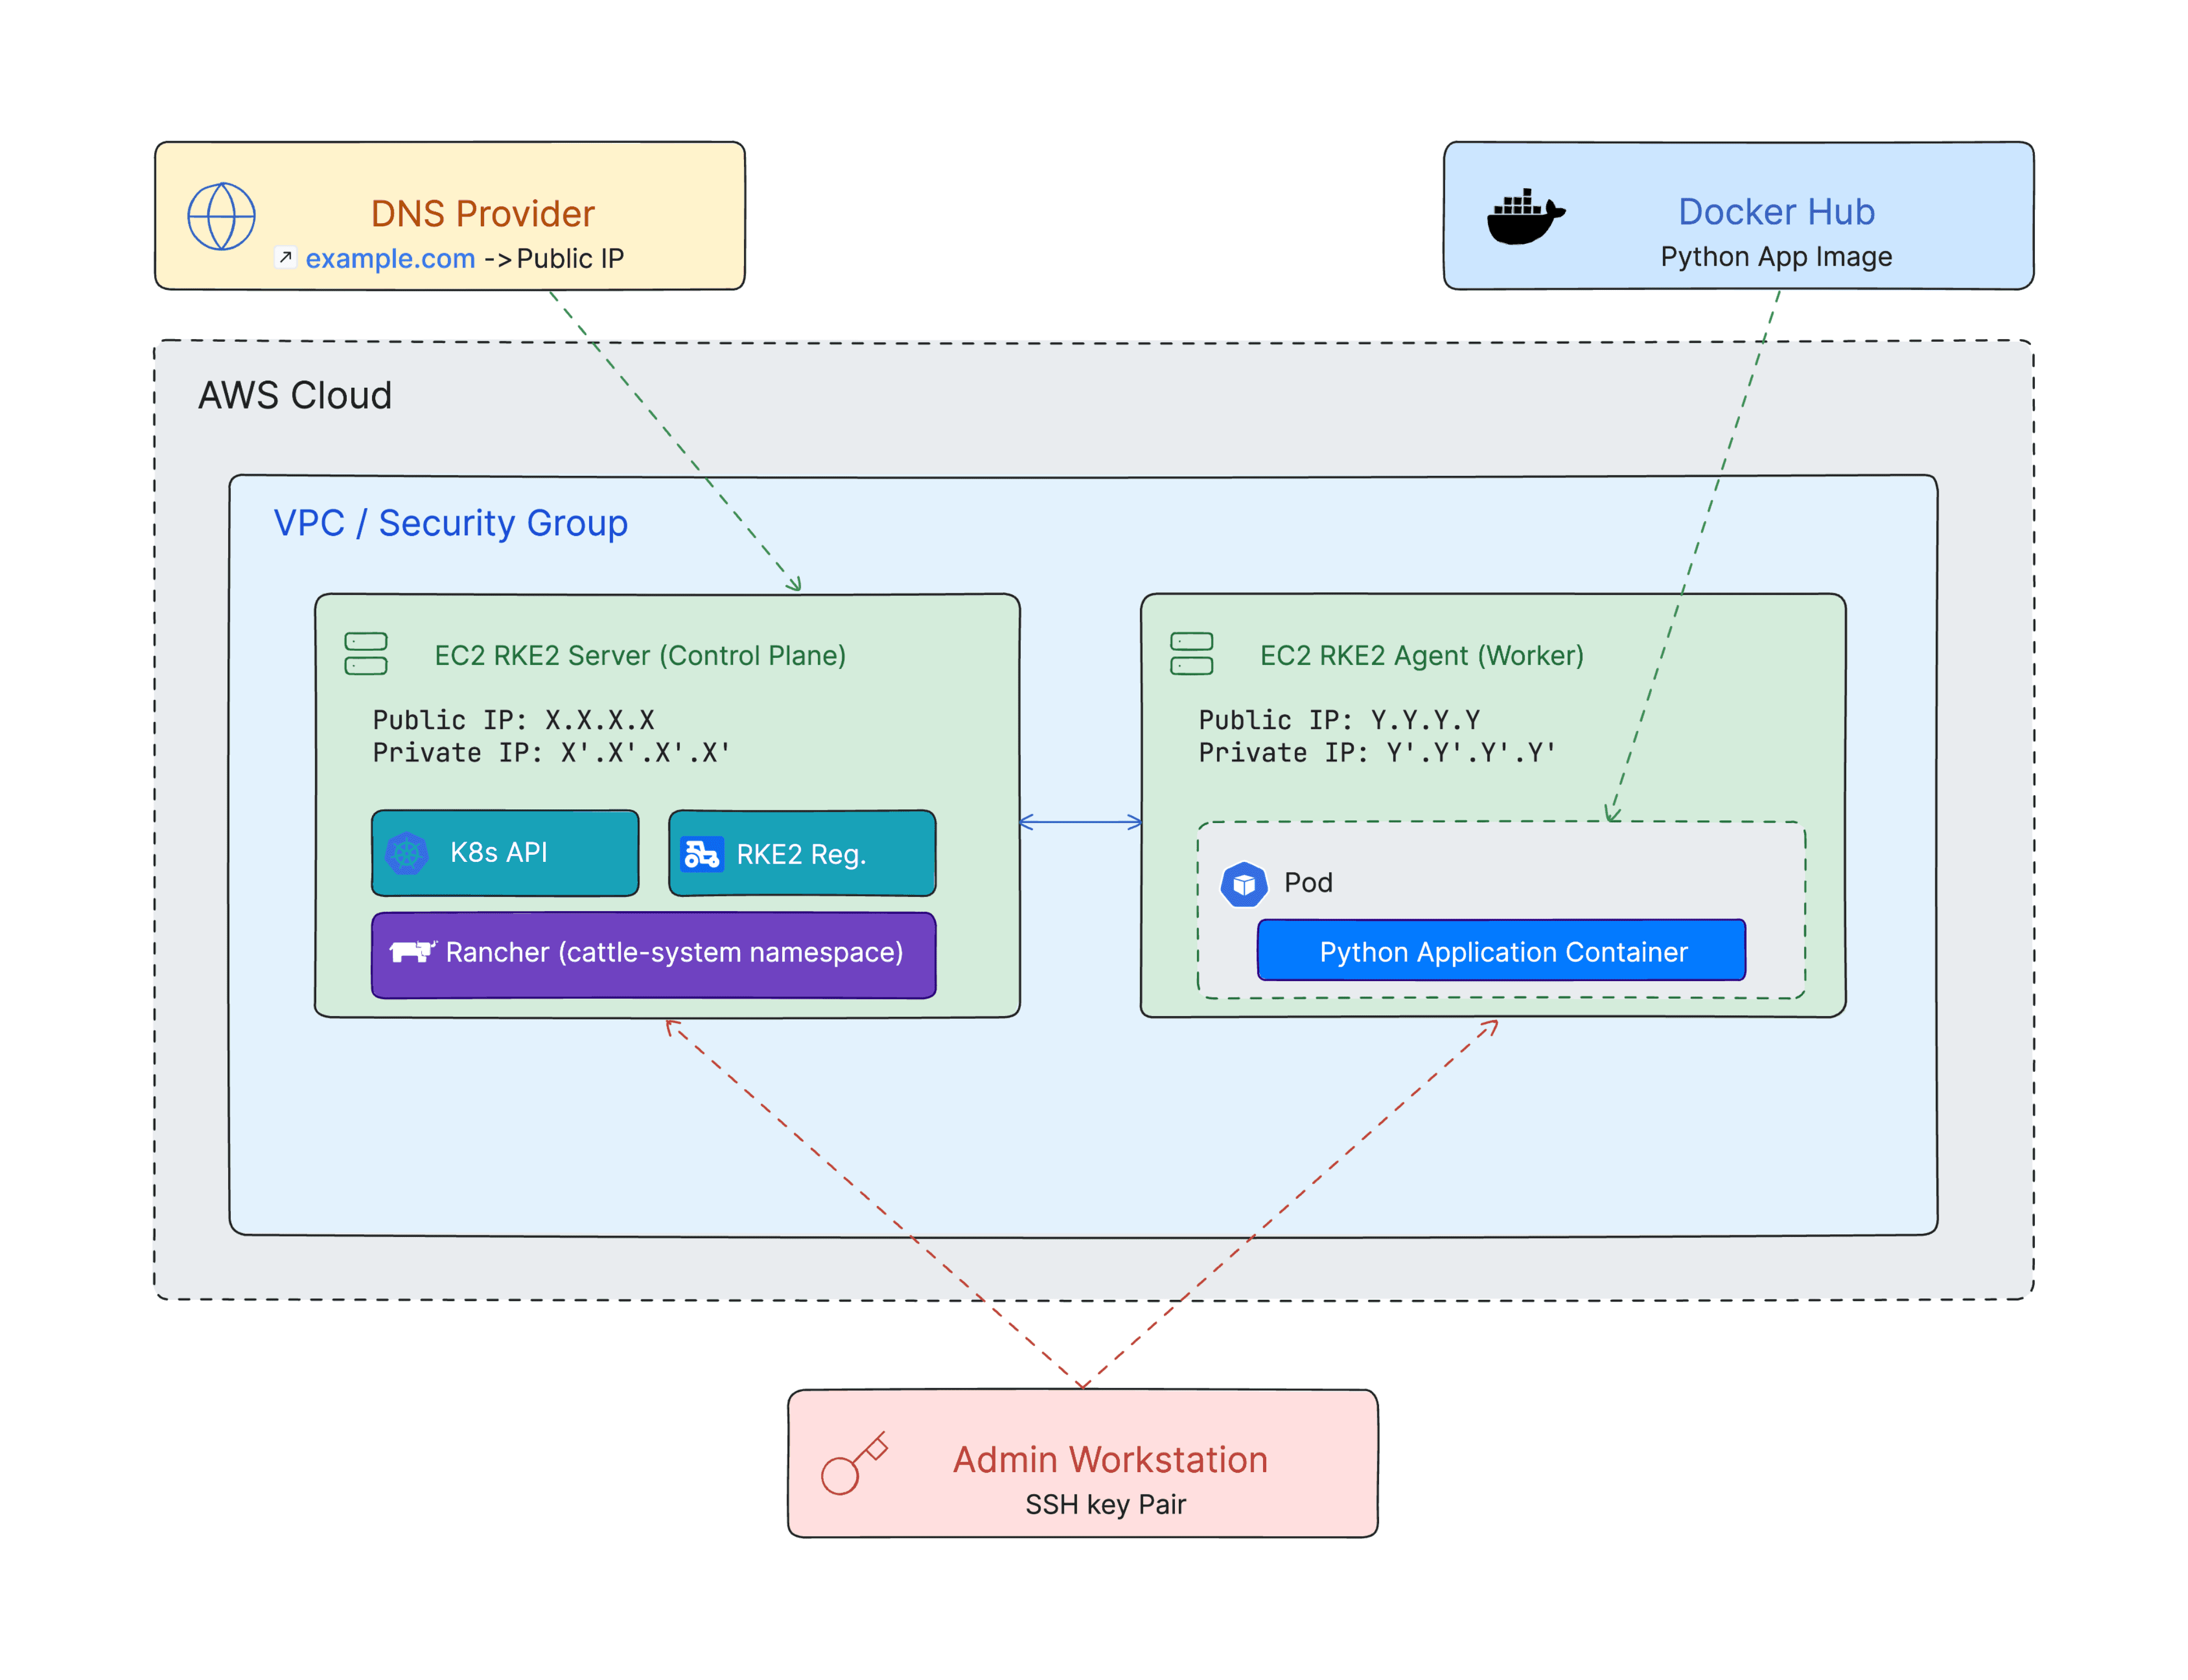
To recap this phase, I essentially built a static website hosting solution with defense-in-depth:
The S3 bucket is private (no public access), and not even directly accessible by CloudFront across accounts without special measures.
Cross-account access was achieved using S3 Access Points, keeping the bucket policy tight and specific.
CloudFront provides a CDN layer and HTTPS termination using ACM certificates.
Route 53 DNS points my custom domain to CloudFront, and I even enabled SSL/TLS for in-transit encryption (CloudFront to viewers, and CloudFront to S3 all encrypted).
This part of the project was by far the most challenging for me. I spent many late-night hours reading AWS docs, trying different approaches, and learning from each failure. Yet, it was also the most rewarding. Not only did I get the static site working, but I also gained a deep understanding of AWS cross-account permissions, S3 security features, and CloudFront configurations. The persistence paid off. With the front-end finally up and running on a solid foundation, I moved on to making the site dynamic with a visitor counter.
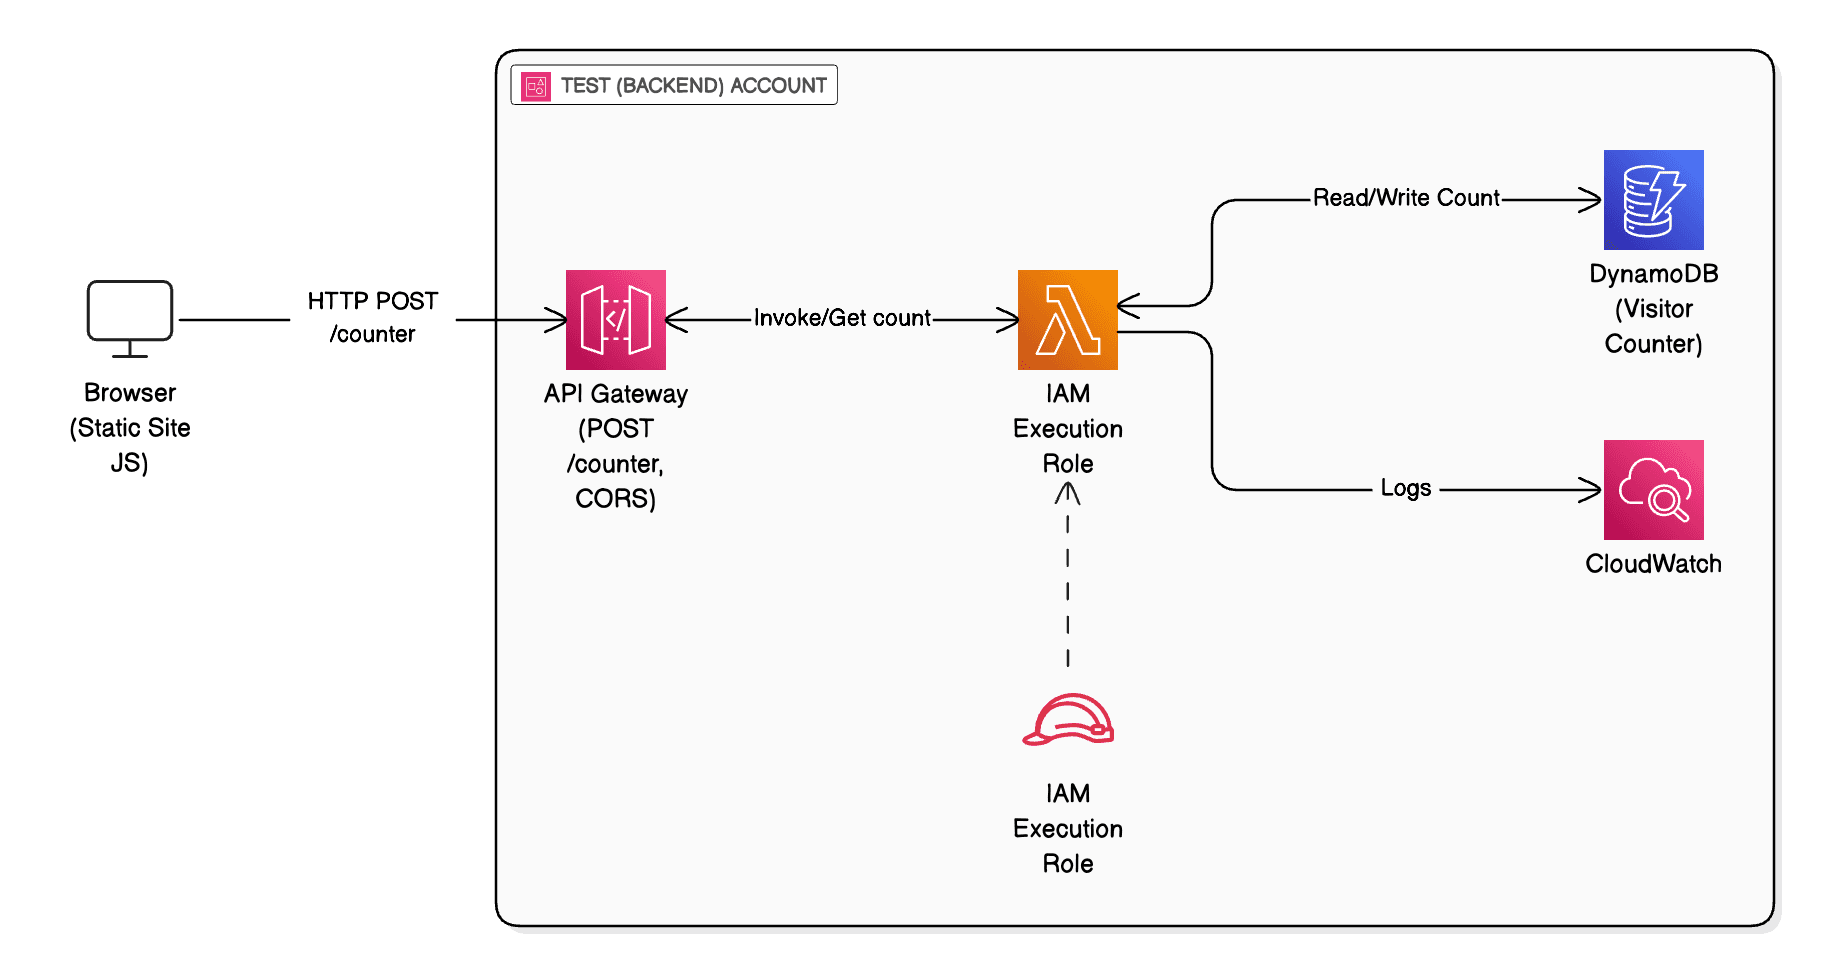
Phase 4: Backend Visitor Counter (API Gateway + Lambda)
The Cloud Resume Challenge isn’t just a static webpage – it also requires a visitor counter that increments whenever someone views your resume. This meant diving into the back-end: creating an API, a database, and some code to connect them. I chose to implement this via AWS Lambda, API Gateway, and DynamoDB as the challenge suggested, all in my Test (backend) account. I hadn’t done much serverless programming before, so this was an exciting chance to learn how cloud back-ends work.
First, I set up a DynamoDB table to store the visitor count. A simple table with a primary key (e.g. visitorID) and an attribute for the count was sufficient. Next, I wrote a Python AWS Lambda function that would be triggered by an API call. The Lambda’s job was straightforward: read the current count, increment it, and return the updated count (or if no record exists yet, initialize it to 1). Writing the Python code was relatively easy, aided by the boto3 AWS SDK for DynamoDB operations. The bigger learning curve was configuring all the moving parts around it.
I created a REST API using Amazon API Gateway and integrated it with the Lambda (using a Lambda Proxy integration so my code could return an HTTP response). I defined a POST method (for retrieving & incrementing the counter in one go). One thing I had to handle was CORS (Cross-Origin Resource Sharing). My resume/portfolio site is served from CloudFront on my custom domain, but the API Gateway has its own URL (by default something like https://xyz.execute-api.us-east-1.amazonaws.com/dev/counter). The browser would treat the API call as coming from a different origin, so without proper CORS headers the requests would be blocked. To solve this, I enabled CORS on the API Gateway method, allowing requests from my website’s origin. I configured the API Gateway to add an Access-Control-Allow-Origin: https://myresume.example.com header (and also allow POST method and any custom headers if needed). This was another mini-lesson: I gained practical understanding of browser security and how to enable cross-domain API calls safely.
With the API in place, I wrote a bit of JavaScript to include in my index.html file. On page load, the script would call the API endpoint running:
and get the returned visitor count (I chose not to update a counter display on the webpage for some reasons). It felt pretty magical to see a dynamic number getting updated on every visit on the site. On the AWS side, I gave my Lambda function an IAM role with permission to read/write the DynamoDB table, and set up CloudWatch Logs to help debug any issues during development. For instance, my first attempt at the Lambda code had a bug where I wasn’t properly JSON-encoding the response, which I quickly fixed after checking the logs and seeing the error stack trace.
To keep the API secure (this is my personal resume/portfolio, not a public service), I considered protection mechanisms. At minimum, I deployed the API Gateway with a unique URL (not easily guessable) and enabled throttling to prevent abuse. For additional security, one could use an API key or IAM authentication, but exposing those to the frontend would be impractical. Instead, I relied on the fact that the only intended client of this API is my own website. The CORS policy already restricts which origins can use it. Down the road, I might explore a more robust auth (maybe a Lambda authorizer that only allows requests with a specific header or token that my site knows). But given the scope and that the counter doesn’t expose sensitive data, I found this acceptable.
The backend phase taught me about the “glue” of cloud applications: tying together compute (Lambda), storage (DynamoDB), and connectivity (API Gateway). It was gratifying to see how easily AWS services integrate: a few clicks to create an API, attach it to Lambda, and I had a functioning REST endpoint. I also learned to be mindful of IAM permissions, ensuring the Lambda’s role had the exact DynamoDB actions it needed and nothing more, a nod to security best practices. Seeing the visitor count tick up when I refreshed the page was a small but satisfying reward, signaling that the front-end and back-end were successfully talking to each other.
Phase 5: Automation with Terraform and GitHub Actions
By this point, I had a working cloud resume (front-end and back-end) deployed across several AWS services and accounts. Manually configuring all of that via the console was educational, but real cloud engineers automate everything. The challenge expects you to use Infrastructure-as-Code (IaC) and set up CI/CD pipelines, which is exactly what I tackled in this phase. I chose Terraform for IaC and GitHub Actions for the CI/CD pipeline.
Why Terraform? The Cloud Resume Challenge guidebook calls Terraform “by far the most common IaC mod people make,” because it’s the rare multi-cloud tool that practically every DevOps team touches; whether they run on AWS, Azure, or Google Cloud. Its human-readable HCL syntax, huge module ecosystem, and even an official CRC-specific guide make it an obvious choice. By standardizing on Terraform I gained transferable, employer-recognizable skills while codifying everything in the Backend: DynamoDB, API Gateway, Lambda, IAM roles and policies, into a single declarative blueprint that I can plan, apply, and destroy on demand.
Next, I set up a GitHub repository for my project and wrote a GitHub Actions workflow to automate deployment. I ended up with a three-stage pipeline to cover different aspects of the project:
Infrastructure Deployment (Terraform) – This workflow fires on any commit that touches the IaC/ folder (or by manual dispatch). It checks out the repo, installs Terraform 1.5.7, and authenticates to AWS with aws-actions/configure-aws-credentials using access-key secrets (switching to OIDC is on my roadmap to drop static keys). Inside IaC/ it runs:
After apply, a small step captures, writes it to api_url.txt, and uploads that as a build artifact so later jobs know the live endpoint. This single job provisions all infrastructure and packages the Lambda code (via the Terraform AWS Lambda module), keeping the pipeline simple for this project. In a real-world scenario, I might separate concerns (infrastructure vs application code), but for this project I wired them together for simplicity.
Lambda Deployment – While Terraform can deploy Lambda code, I set up a separate job for updating the Lambda function code, triggered when I change the Python source. This job would zip the code (and dependencies if any), and push the new artifact to AWS Lambda (via Terraform or AWS CLI). The reason for a separate step was to allow quicker iteration on Lambda logic without a full infra redeploy. In practice, I could combine this with the Terraform apply, but I liked having an explicit stage that says “now we’re updating the function code.”
Playwright Smoke Tests – The final stage of my pipeline is a smoke test suite using Playwright. Playwright is a browser automation tool that allowed me to write end-to-end tests for my resume site. I wrote a test that spins up a headless browser, navigates to my API URL, and checks that the page loads and the visitor count is returned. This is a step beyond the challenge requirements, but I wanted to ensure that after any deployment, the backend actually works – not just that resources deployed. The smoke tests gave me confidence that my changes hadn’t broken the integration between front and back end. Using Playwright in GitHub Actions was a fun exercise: I used Github Actions to set up the Playwright environment, and it runs the test script on each pipeline run. If the tests fail, the pipeline fails, alerting me to investigate my infrastructure and configurations.

Setting up CI/CD took some effort, but it was incredibly rewarding to see it work. Now I can push a single commit and GitHub Actions will automatically rebuild and update my resume in the cloud, then run tests. This is the same kind of pipeline used in professional software teams, so it felt like a taste of DevOps in action. I also receive notifications for myself so I know when deployments succeed or fail. By choosing Terraform, I have a declarative source of truth for my infrastructure, making it easy to reproduce the environment or onboard others (hypothetically) to the project. Additionally, Terraform will help tear everything down cleanly when I need to, ensuring I don’t leave rogue resources incurring costs.
Phase 6: Custom Features & Security Mods
One thing I loved about the Cloud Resume Challenge is its encouragement of mods: additional features you can add to showcase particular skills or interests. I chose to implement a Security Mod by enabling DNSSEC for my custom domain, and I also added the use of Playwright (mentioned above) as a kind of Developer/DevOps Mod for testing.
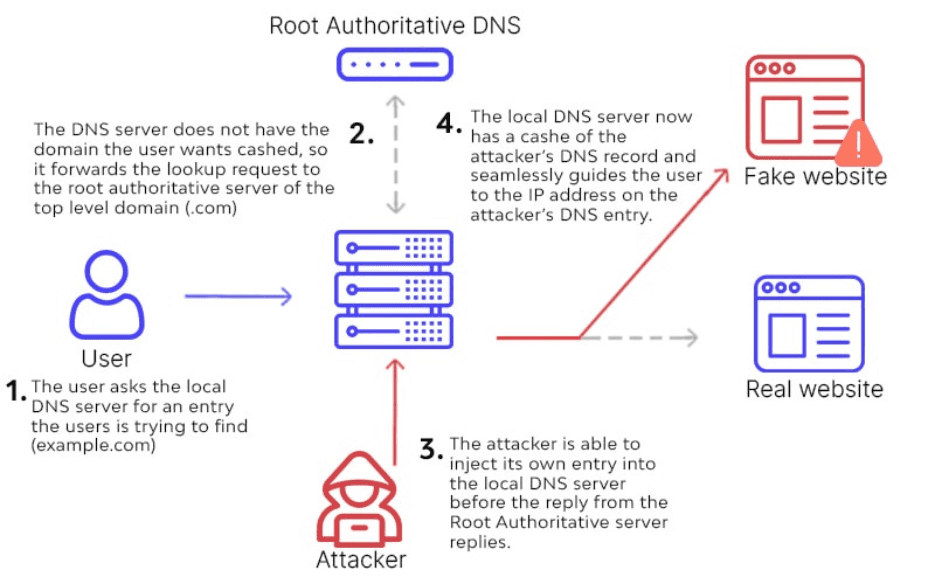
DNSSEC (Domain Name System Security Extensions): DNSSEC was a feature I hadn’t worked with before, but being in cybersecurity, it piqued my interest. To harden my domain, I enabled DNSSEC in Route 53 and stored the key‑signing key (KSK) in AWS KMS, which handles automatic key rotation so I don’t have to track expiry dates manually. Enabling DNSSEC on my Route 53 hosted zone was surprisingly straightforward – a few clicks to enable signing, and then publishing the DS record to my domain registrar (which, since I used Route 53 to register the domain, was just another step in the console). Understanding how DNSSEC works was the trickier part. I read this ICANN article and watched this great YouTube video to grasp the concepts behind it. In essence, DNSSEC adds a layer of authentication to DNS queries by using digital signatures. It ensures that when someone looks up myresume.example.com, the DNS response they get is verifiably from the legitimate DNS server and hasn’t been tampered with in transit. This protects against DNS spoofing or cache poisoning attacks, where an attacker could otherwise trick a client into going to a malicious IP. It’s important to note (and I learned this in my research) that DNSSEC does not encrypt the DNS data, it’s not about privacy , but it guarantees integrity and authenticity of DNS answers. I like to think of it as an added trust layer on top of the confidentiality that SSL/TLS already provides. Now, even though a personal resume site isn’t a high-value target, enabling DNSSEC was a great learning experience and demonstrates my willingness to go the extra mile on security. Plus, if I ever host something more sensitive on that domain, the DNSSEC chain of trust is already in place.
DNS WITHOUT DNSSEC
DNS WITH DNSSEC

Beyond DNSSEC, I also ensured other security best practices: for example, my S3 bucket has encryption enabled, CloudFront is set to enforce HTTPS, and all my IAM roles follow least privilege. These weren’t “flashy” features to show off, but they gave me peace of mind and are worth mentioning in interviews or discussions about the project.
Playwright for Testing: I touched on this in the CI/CD section, but it’s worth highlighting as a custom addition. Writing Playwright tests was not required by the challenge – I did it to push myself on the DevOps side. Many challenge takers use simpler methods to test (or sometimes manual testing), but I treated my resume site like a production app that deserved automated tests. This gave me confidence in my deployment pipeline; if something misconfigures the API or breaks the JS, I’ll know immediately from a failing test. It was also my first time using Playwright, and I found it pretty intuitive (the ability to auto-generate test code by recording actions in a browser is super neat). Including this as a feature of my project shows that I not only care about building things, but also about verifying and maintaining them – a mindset that’s crucial in real-world cloud projects.
Other small mods and tweaks I implemented along the way:
AWS Budgets & Alerts: In the Management account, I set up a small budget alarm to notify me if the project costs exceed a few dollars. The entire stack is within AWS free tier limits, but it’s good practice to monitor costs (especially since CloudFront and DNS can incur small charges). This wasn’t part of the challenge steps, just something I personally wanted.
Alternate Hosting Mode: While I ultimately served the site through CloudFront, I left the S3 static website hosting disabled intentionally, forcing all traffic through the CloudFront distribution for better security and performance. This is technically a mod because the simplest challenge path would allow S3 to serve the site publicly (less secure and not using a CDN). My approach was more production-grade.
Each of these additions either enhanced the security, reliability, or maintainability of my resume site. They also each taught me something new. For example, by setting up an AWS Budget, I learned how to use AWS Cost Explorer and appreciate the cost of each component (thankfully just cents so far). All these little mods rounded out the project nicely and made it feel truly mine.
Phase 7: Project Architecture Diagram

Phase 8: Reflections & Takeaways
Completing the Cloud Resume Challenge was as much a test of character as of technical ability. Looking back, a few things stand out:
Biggest Challenges: Without a doubt, the hardest part was wrangling AWS permissions for cross-account access and CloudFront. There were moments I felt utterly stuck, for example, when my CloudFront kept getting “Access Denied” or when I couldn’t see the bucket from another account. Solving these required patience and a lot of reading. I basically became a detective: gathering clues from error messages, AWS docs, forums, and piecing together a solution. That process, though frustrating at times, massively deepened my understanding of AWS. Other tricky bits included understanding the nuance of CloudFront’s alternate domain and certificate settings, and configuring the IAM roles just right so that Terraform and CI/CD could operate accross accounts. But each challenge overcome was a confidence booster. Now, if I encounter a similar issue at work or in another project, I have a playbook of things to try (and things not to do!).
Learning Mindset: One philosophy I followed was no shortcuts. It was tempting when I was stumped to look for a step-by-step tutorial or copy someone’s solution from a blog. While I did reference documentation and certain forum answers, I resisted simply doing a YouTube “copy-paste” of the project. I’m glad I did it the hard way. The sense of accomplishment I got from figuring it out myself is huge. For example, when I finally discovered that S3 Access Points could solve my problem, it felt like I earned that knowledge, and I won’t soon forget it. My advice to anyone doing this challenge (or similar projects) is to embrace the trial-and-error process – you’ll come out of it much more resilient and resourceful. It truly reinforced that failing at first is OK, as long as you learn and iterate. And remember, "Everything fails, all the time." - Werner Vogels.
Time and Effort: I dedicated roughly two weeks to this project from start to finish, working mostly in the evenings and weekends. It was an intense two weeks, but manageable. Planning the work in phases (like I’ve outlined above) helped a lot – it gave me mini-victories to celebrate (first the website, then the API, then automation, etc.) and kept me motivated. There were definitely times I had to step away (especially during the CloudFront saga) and clear my head. But then I’d come back with fresh eyes and make progress. In a way, this challenge taught me how to teach myself: how to break a big problem into parts and solve them one by one.
Bridging Theory to Practice: Having certifications proved useful because I knew the terminology and general ideas (like what S3, CloudFront, or DynamoDB are). But doing the challenge showed me the difference between book knowledge and actual implementation. For instance, knowing “DynamoDB is a NoSQL database” is one thing, but actually designing a table and setting up IAM for Lambda is another. This project was the first time I truly saw how all these AWS services can connect to form a full solution (because it's my first project I guess). It’s given me a portfolio piece I’m proud of and can discuss in interviews. More importantly, it has demystified a lot of the cloud for me, AWS feels less like a black box now and more like a toolbox that I know how to use.
Satisfaction and Next Steps: Deploying that final change and seeing everything work was incredibly satisfying. It’s the joy of creation: I built a real, working website and system from the ground up without relying on a pre-baked template. And it’s my resume on there, which is… "poetic". The challenge doesn’t end here, though. I plan to continue with more mods and improvements. The official guidebook suggests DevOps Mods (like adding monitoring dashboards), which I’m interested in. I might also containerize the backend in the future or experiment with AWS CDK to compare with Terraform. This project has kindled an even stronger interest in cloud engineering for me.
In conclusion, the Cloud Resume Challenge was a transformative experience. It pushed me to apply what I learned in my certifications in a practical way and taught me new skills ranging from web development to DevOps. I encountered real-world cloud problems (and solved them) which gave me stories to tell and lessons to remember. Most of all, it reinforced my passion for cloud technology, there’s something deeply rewarding about deploying to the cloud and knowing people around the world (even if just recruiters or friends for now) can see and interact with what you built. If you’re considering this challenge, I wholeheartedly recommend it. It’s not easy, but as I like to say, “no error, no gain.” Each error message is an opportunity to learn, and each solution is a step forward in your cloud journey. My resume is in the cloud now, and so, it seems, is my head - dreaming about the next cloud project to take on!
Disclaimer/Note on AI assistance: Portions of this blog post were refined with the help of AI. All architecture decisions, troubleshooting steps, and personal reflections are my own; the AI was used strictly for editing, summarizing, and clarity.